
Stable Video Diffusion完全ガイド!使い方から商用利用まで徹底解説
- Stable Video DiffusionはImage-to-Video特化モデルであり、静止画の構図や被写体を保った短尺動画生成に強い
- 商用利用の可否はMembershipではなくライセンス体系(Community / Enterprise)を基準に判断
- 実運用ではモデル選択とパラメータ調整に加え、実行環境(ComfyUIなど)の選び方が品質と安定性を左右する
2023年11月、画像から動画を生成してくれるAI「Stable Video Diffusion」がGitHubで公開され、誰でも「画像を入力とした動画生成」ができるようになりました。これにより、任意の入力画像に沿った動画の生成が、とても簡単にできるんです…!
GitHubのスター数は、なんと25000を超えており、Stability AIが開発したAIの中でも大注目のプロジェクトです。
この記事ではStable Video Diffusionの使い方や、有効性の検証まで行います。本記事を熟読することで、Stable Video Diffusionの凄さを実感し、Image2Videoの魅力にとりつかれるでしょう。
ぜひ、最後までご覧ください。
\生成AIを活用して業務プロセスを自動化/
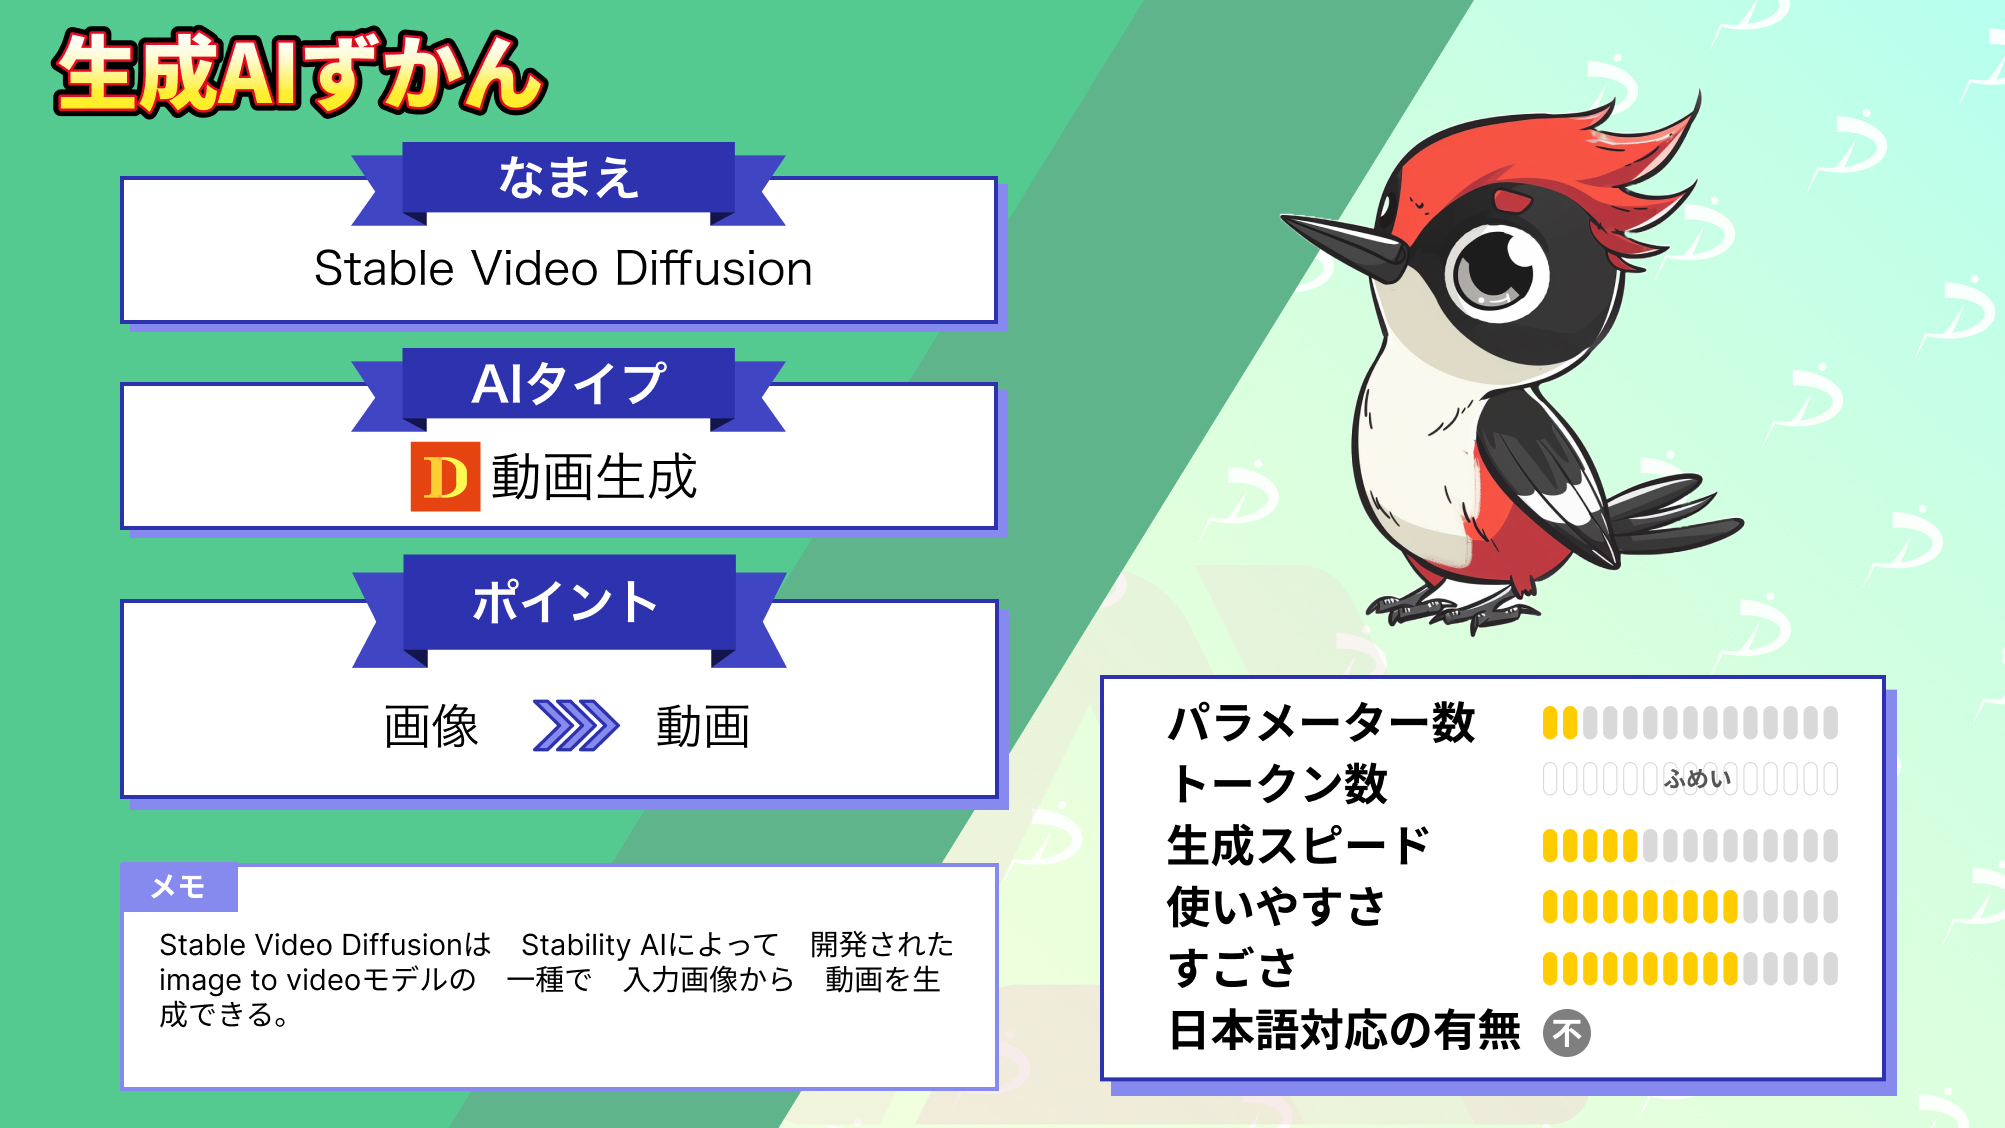
Stable Video Diffusionの概要
Stable Video Diffusion(SVD)は、Stability AIによって開発されたImage2Videoモデルの一種です。画像生成AIのStable Diffusionをベースに作られており、入力画像から動画を生成できます。
具体的には、これまでStable Diffusionにおいて、プロンプトとしてテキストを入れていた部分に、画像を入力すれば、その画像の内容に即した動画が生成されるのです。
Stable Video Diffusionは、14フレームおよび25フレームを生成できる2種類の画像からビデオへのモデルとしてリリースされており、毎秒3〜30フレームのフレームレートで生成が可能となっています。


Stable Video Diffusionの仕組み
Stable Video Diffusionの訓練は、3つの段階に分かれています。
第一段階では、テキストから画像への事前学習です。第二段階は動画の事前学習、第三段階は高品質動画へのファインチューニングという流れで訓練が行われます。
| 学習段階 | 学習内容 | 使用データ・特徴 |
|---|---|---|
| 第一段階 | テキストから画像への事前学習 | Stable Diffusionの技術を活用し、大規模かつ多様な画像データセットを用いて、基本となる空間的特徴を学習 |
| 第二段階 | 動画の事前学習 | 大量の低解像度動画データを使用して動画特有の特徴を学習。フィルタリングやカット検出により、静的シーンや低品質なクリップを除外 |
| 第三段階 | 高品質動画へのファインチューニング | 高解像度かつ高品質な少量データセットで微調整を実施。視覚品質が高く、カメラ動作とキャプションの整合性が取れた動画を使用 |
この訓練過程を経ることでStable Video Diffusionは動画の生成を可能としています。
Stable Diffusion自体、元々は静止画像を生成することに長けています。その技術に「時間的要素」を組み込み、不自然な挙動にならないように学習したデータから前後のフレームの動き方を参照することによって、動画生成が可能です。
一方で、前後のフレームの動き方のみでは、カメラの動きを再現することができません。そこで、Low-Rank Adaptation(LoRA)という技術を使って、カメラの動きをコントロールします。
Stable Video Diffusionのモデルバリエーションと選び方
Stable Video Diffusionは、静止画像を条件として短い動画クリップを生成するImage-to-Videoモデルです。複数のモデルバリエーションが公開されており、フレーム数・推奨解像度・安定性などがそれぞれ異なります。
svd / svd-xt / svd-xt-1-1の違い
Stable Video Diffusionには主に以下の3つのバージョンがあります。
| モデル | 生成フレーム数 | 推奨解像度 | 特徴 |
|---|---|---|---|
| svd | 14フレーム | 576×1024 | ベースライン。軽量で試しやすい |
| svd-xt | 25フレーム | 576×1024 | 滑らかさと時間的一貫性が向上 |
| svd-xt-1-1 | 25フレーム | 576×1024 | 安定性・出力品質が高く初期値でも扱いやすい |
基本版となるStable Video Diffusionは、14フレームの動画を生成するバージョンで、比較的短いクリップ向けです。モデルカードでは14フレーム・解像度576×1024でトレーニングされたことが明記されています。
SVD-XTは、25フレームの動画を生成。14フレーム版の学習をベースにして、フレーム数と安定性が向上しています。
さらにSVD-XT-1-1は、25フレーム版を進化させたバージョンです。解像度576×1024で生成され、motion_bucket_idやfpsなどの調整値がデフォルト固定された状態でも安定した出力が可能。
得意な表現と苦手な表現
Stable Video Diffusionは静止画像からのモーション生成に特化しており、静止画の細部を保ちながら自然な動きを再現することができます。
特に被写体の周辺の点滅や揺れなどの処理は比較的滑らかです。 ただし、その一方で、複雑なカメラワークや長尺の時間的変化、大きく変形するようなアニメーション表現には不向きです。
また、動きの強さや背景の変化に対しては調整パラメータが直接関与しないと破綻しやすい側面があるため、用途によっては後処理や補間処理が必要なケースが出てきます。
初めて使う場合はどのモデルを選ぶべきか
モデル選びは、用途・安定性・計算リソースのバランスで決めるとよいでしょう。
とりあえず試したい場合や軽く動かしたい場合は、svdがおすすめ。初めてStable Video Diffusionを触る人が最初に試すには、学習済みの動作が軽く環境要件が比較的低いこのモデルが適しています。結果の傾向を掴むのに十分な動画が生成できます。
ある程度滑らかな動画を生成したい場合は、svd-xtが向いています。フレーム数が多く動きの滑らかさが向上し、ベース版よりも時間的一貫性が高くなります。
ただし、生成負荷は若干上がります。安定性や出力品質を重視したい場合は、svd-xt-1-1が良いです。初期値でも比較的安定した生成ができ、fpsやmotion_bucket_idのデフォルト値が整えられているため、初心者でも安心感があります。長めの滑らかさと高い再現性を狙いたい場合に向いています。
Stable Video Diffusionのライセンス及び料金体系
| 非商用利用 | プロフェッショナルプラン | エンタープライズプラン | |
|---|---|---|---|
| 対象者 | 個人利用および研究用 | 年間収益1億円未満、機関投資1億円未満、月間アクティブユーザー100万人未満のクリエイター・開発者向け | プロフェッショナルより大規模な企業向け |
| 費用 | 無料 | 月額20ドル | カスタム ※要問い合わせ |
| セルフホストモデル | 非商用利用 | 商用利用 | 商用利用 |
| 特徴 | ・新しいモデルへの早期アクセス ・パブリックコミュニティへのアクセス | ・プロフェッショナル向けDiscordコミュニティ ・非商用プランのすべて | ・カスタム価格 ・エンタープライズ機能 ・プロフェッショナルプランのすべて |
Stable Video Diffusionでは、STABLE VIDEO DIFFUSION NON-COMMERCIAL COMMUNITY LICENSE AGREEMENTというライセンスとなっています。
一部を抜粋して日本語に訳したものが下記になります。
基本的には無料で使えますが、無料版だと商用では使えないので注意してください。(詳しくは後述しています)
ライセンスは適宜更新されるようなので利用する前に必ずチェックしておきましょう。
なお、アイデアを動画にできる生成AIについて知りたい方はこちらの記事をご覧ください。
Stable Video Diffusionの商用利用は不可能?
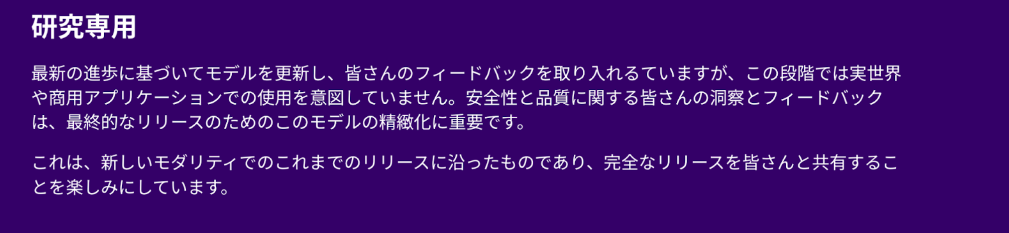
Stable Video DiffusionをリリースしたStability AIの発表によると「Stable Video Diffusionは研究用であり、現段階では商用アプリケーションでの使用を意図していない」と書かれています。
ただ、2023年12月にStability AIは「顧客が同社のモデルを商業利用する方法を標準化し、有償メンバーシッププランを開始する」と発表しています。有償メンバーシップは収益性とオープン性のバランスをとることを目的としており、ユーザーに商業利用する権利を付与する方法を「再定義」するものとして位置付けられています。
メンバーシップは、
- Non-Commercial:個人・研究利用向けの無料プラン
- Professional:機関投資家・クリエイター・開発者・新興企業向けの月額20ドルのプラン
- Enterprise:Professinalプランよりも大きな顧客向けのカスタムプラン
の3種類が用意されています。
いずれのプランでも、SDXL(Stable Diffusion XL) TurboやStable Video Diffusion・大規模言語モデルの「Stable LM Zephyr 3B」など最新AIモデルへの早期アクセスが提供される予定ですが、商業利用が可能なのはProfessionalプランとEnterpriseプランのみとなるようです。
商用利用したい場合は、有料プランに登録する必要がありそうです。
2026年2月時点でのライセンスについては、Stable Video DiffusionはStability AIが定義するCore Modelsに含まれており、年間収益が1M USD未満の個人・小規模事業者であれば、Communityライセンスの範囲で商用利用が可能です。


Stable Video Diffusionの使い方
ではStable Video Diffusionを動かすための必要なスペックの紹介と準備をご説明します。
Stable Video Diffusionを動かすために必要なスペック
今回、Stable Video Diffusionを動かしたのは下記の環境です。
■Google Colab(無料プラン)
GPU:T4
無料プランのT4でもStable Video Diffusionは動かすことができましたが、生成までに時間がかかりました。
メモリが上限に張り付きそうになったしていたため、ギリギリのラインで動いていたようです。
Stable Video Diffusionのセットアップ方法
Stable Video Diffusionを試すには様々な方法がありますが、今回は以下のツイートを参考にしました。なお、HuggingFaceのWRITEのトークンが必要になるため事前に準備しておきましょう。
まずは、以下のコードを実行して、Setupを完了させます。
#@title Setup

!nvidia-smi

!git clone https://github.com/Stability-AI/generative-models.git

# install required packages from pypi

# !pip3 install -r generative-models/requirements/pt2.txt

# manually install only necesarry packages for colab

!wget https://gist.githubusercontent.com/mkshing/4ad40699756d996ba6b3f7934e6ca532/raw/3f0094272c7a2bd3eb5f1a0db91bed582c9e8f01/requirements.txt

!pip3 install -r requirements.txt

!pip3 install -e generative-models

!pip3 install -e git+https://github.com/Stability-AI/datapipelines.git@main#egg=sdata

!pip3 install gradio

#@title Colab hack for SVD

# !pip uninstall -y numpy

# !pip install -U numpy

!mkdir -p /content/scripts/util/detection

!ln -s /content/generative-models/scripts/util/detection/p_head_v1.npz /content/scripts/util/detection/p_head_v1.npz

!ln -s /content/generative-models/scripts/util/detection/w_head_v1.npz /content/scripts/util/detection/w_head_v1.npz
次に、HuggingFaceのトークンをセットします。
#@title Login HuggingFace to download weights

#@markdown Please make sure to fill in the form in the model cards and accept it.

from huggingface_hub import login

login()
上記のコードを実行するとトークンを入力するエリアが表示されるので各自で発行したトークンを入力して「Login」をクリックします。

次に、以下のコードを実行して、モデルのcheckpointのダウンロードと、モデルのロードをしましょう。
# @title Download weights

import os

import subprocess

from huggingface_hub import hf_hub_download

version = "svd-xt" #@param ["svd", "svd-xt", "svd-xt-1-1"]

TYPE2PATH = {

    "svd": ["stabilityai/stable-video-diffusion-img2vid", "svd.safetensors"],

    "svd-xt": ["stabilityai/stable-video-diffusion-img2vid-xt", "svd_xt.safetensors"],

    "svd-xt-1-1": ["stabilityai/stable-video-diffusion-img2vid-xt-1-1", "svd_xt_1_1.safetensors"],

}

repo_id, fname = TYPE2PATH[version]

ckpt_dir = "/content/checkpoints"

ckpt_path = os.path.join(ckpt_dir, fname)

# @markdown This will take several minutes. <br>

# @markdown **Reference:**

# @markdown * `svd`: [stabilityai/stable-video-diffusion-img2vid](https://huggingface.co/stabilityai/stable-video-diffusion-img2vid) for 14 frames generation

# @markdown * `svd-xt`: [stabilityai/stable-video-diffusion-img2vid-xt](https://huggingface.co/stabilityai/stable-video-diffusion-img2vid-xt) for 25 frames generation

# @markdown * `svd-xt-1-1`: [stabilityai/stable-video-diffusion-img2vid-xt-1-1](https://huggingface.co/stabilityai/stable-video-diffusion-img2vid-xt-1-1) for 25 frames generation with fixed conditioning at 6FPS and Motion Bucket Id 127

os.makedirs("checkpoints", exist_ok=True)

if os.path.exists(ckpt_path):

  print("Already downloaded")

else:

  hf_hub_download(

      repo_id=repo_id,

      filename=fname,

      local_dir=ckpt_dir,

  )

#@title Load Model

import sys

from omegaconf import OmegaConf

import torch

sys.path.append("generative-models")

from sgm.util import default, instantiate_from_config

from scripts.util.detection.nsfw_and_watermark_dectection import DeepFloydDataFiltering

def load_model(

    config: str,

    device: str,

    num_frames: int,

    num_steps: int,

    ckpt_path: str = None,

):

    config = OmegaConf.load(config)

    config.model.params.conditioner_config.params.emb_models[

        0

    ].params.open_clip_embedding_config.params.init_device = device

    config.model.params.sampler_config.params.num_steps = num_steps

    config.model.params.sampler_config.params.guider_config.params.num_frames = (

        num_frames

    )

    if ckpt_path is not None:

        config.model.params.ckpt_path = ckpt_path

        print(f"Changed `ckpt_path` to {ckpt_path}")

    with torch.device(device):

        model = instantiate_from_config(config.model).to(device).eval().requires_grad_(False)

    filter = DeepFloydDataFiltering(verbose=False, device=device)

    return model, filter

if version == "svd":

    num_frames = 14

    num_steps = 25

    # output_folder = default(output_folder, "outputs/simple_video_sample/svd/")

    model_config = "generative-models/scripts/sampling/configs/svd.yaml"

elif "svd-xt" in version:

    num_frames = 25

    num_steps = 30

    # output_folder = default(output_folder, "outputs/simple_video_sample/svd_xt/")

    model_config = "generative-models/scripts/sampling/configs/svd_xt.yaml"

else:

    raise ValueError(f"Version {version} does not exist.")

device = "cuda" if torch.cuda.is_available() else "cpu"

model, filter = load_model(

    model_config,

    device,

    num_frames,

    num_steps,

    ckpt_path,

)

# move models expect unet to cpu

model.conditioner.cpu()

model.first_stage_model.cpu()

# change the dtype of unet

model.model.to(dtype=torch.float16)

torch.cuda.empty_cache()

model = model.requires_grad_(False)ちなみに、ここで「version」変数の値を「svd_xt」としています。svdでは14フレーム、svd_xtは25フレームで生成可能なモデルとなっていますので用途に応じたものを選択してください。
なお、より高性能な「svd-xt-1-1」を利用するには住所などを入力し、同意しないと使えませんのでご注意ください。
次に、以下のコードを実行して、動画生成を行うための関数を定義します。
# @title Sampling function

import math

import os

from glob import glob

from pathlib import Path

from typing import Optional

import cv2

import numpy as np

import torch

from einops import rearrange, repeat

from fire import Fire

from PIL import Image

from torchvision.transforms import ToTensor

from torchvision.transforms import functional as TF

from sgm.inference.helpers import embed_watermark

from sgm.util import default, instantiate_from_config

def get_unique_embedder_keys_from_conditioner(conditioner):

    return list(set([x.input_key for x in conditioner.embedders]))

def get_batch(keys, value_dict, N, T, device, dtype=None):

    batch = {}

    batch_uc = {}

    for key in keys:

        if key == "fps_id":

            batch[key] = (

                torch.tensor([value_dict["fps_id"]])

                .to(device, dtype=dtype)

                .repeat(int(math.prod(N)))

            )

        elif key == "motion_bucket_id":

            batch[key] = (

                torch.tensor([value_dict["motion_bucket_id"]])

                .to(device, dtype=dtype)

                .repeat(int(math.prod(N)))

            )

        elif key == "cond_aug":

            batch[key] = repeat(

                torch.tensor([value_dict["cond_aug"]]).to(device, dtype=dtype),

                "1 -> b",

                b=math.prod(N),

            )

        elif key == "cond_frames":

            batch[key] = repeat(value_dict["cond_frames"], "1 ... -> b ...", b=N[0])

        elif key == "cond_frames_without_noise":

            batch[key] = repeat(

                value_dict["cond_frames_without_noise"], "1 ... -> b ...", b=N[0]

            )

        else:

            batch[key] = value_dict[key]

    if T is not None:

        batch["num_video_frames"] = T

    for key in batch.keys():

        if key not in batch_uc and isinstance(batch[key], torch.Tensor):

            batch_uc[key] = torch.clone(batch[key])

    return batch, batch_uc

def sample(

    input_path: str = "assets/test_image.png",  # Can either be image file or folder with image files

    resize_image: bool = False,

    num_frames: Optional[int] = None,

    num_steps: Optional[int] = None,

    fps_id: int = 6,

    motion_bucket_id: int = 127,

    cond_aug: float = 0.02,

    seed: int = 23,

    decoding_t: int = 14,  # Number of frames decoded at a time! This eats most VRAM. Reduce if necessary.

    device: str = "cuda",

    output_folder: Optional[str] = "/content/outputs",

    skip_filter: bool = False,

):

    """

    Simple script to generate a single sample conditioned on an image `input_path` or multiple images, one for each

    image file in folder `input_path`. If you run out of VRAM, try decreasing `decoding_t`.

    """

    torch.manual_seed(seed)

    path = Path(input_path)

    all_img_paths = []

    if path.is_file():

        if any([input_path.endswith(x) for x in ["jpg", "jpeg", "png"]]):

            all_img_paths = [input_path]

        else:

            raise ValueError("Path is not valid image file.")

    elif path.is_dir():

        all_img_paths = sorted(

            [

                f

                for f in path.iterdir()

                if f.is_file() and f.suffix.lower() in [".jpg", ".jpeg", ".png"]

            ]

        )

        if len(all_img_paths) == 0:

            raise ValueError("Folder does not contain any images.")

    else:

        raise ValueError

    all_out_paths = []

    for input_img_path in all_img_paths:

        with Image.open(input_img_path) as image:

            if image.mode == "RGBA":

                image = image.convert("RGB")

            if resize_image and image.size != (1024, 576):

                print(f"Resizing {image.size} to (1024, 576)")

                image = TF.resize(TF.resize(image, 1024), (576, 1024))

            w, h = image.size

            if h % 64 != 0 or w % 64 != 0:

                width, height = map(lambda x: x - x % 64, (w, h))

                image = image.resize((width, height))

                print(

                    f"WARNING: Your image is of size {h}x{w} which is not divisible by 64. We are resizing to {height}x{width}!"

                )

            image = ToTensor()(image)

            image = image * 2.0 - 1.0

        image = image.unsqueeze(0).to(device)

        H, W = image.shape[2:]

        assert image.shape[1] == 3

        F = 8

        C = 4

        shape = (num_frames, C, H // F, W // F)

        if (H, W) != (576, 1024):

            print(

                "WARNING: The conditioning frame you provided is not 576x1024. This leads to suboptimal performance as model was only trained on 576x1024. Consider increasing `cond_aug`."

            )

        if motion_bucket_id > 255:

            print(

                "WARNING: High motion bucket! This may lead to suboptimal performance."

            )

        if fps_id < 5:

            print("WARNING: Small fps value! This may lead to suboptimal performance.")

        if fps_id > 30:

            print("WARNING: Large fps value! This may lead to suboptimal performance.")

        value_dict = {}

        value_dict["motion_bucket_id"] = motion_bucket_id

        value_dict["fps_id"] = fps_id

        value_dict["cond_aug"] = cond_aug

        value_dict["cond_frames_without_noise"] = image

        value_dict["cond_frames"] = image + cond_aug * torch.randn_like(image)

        value_dict["cond_aug"] = cond_aug

        # low vram mode

        model.conditioner.cpu()

        model.first_stage_model.cpu()

        torch.cuda.empty_cache()

        model.sampler.verbose = True

        with torch.no_grad():

            with torch.autocast(device):

                model.conditioner.to(device)

                batch, batch_uc = get_batch(

                    get_unique_embedder_keys_from_conditioner(model.conditioner),

                    value_dict,

                    [1, num_frames],

                    T=num_frames,

                    device=device,

                )

                c, uc = model.conditioner.get_unconditional_conditioning(

                    batch,

                    batch_uc=batch_uc,

                    force_uc_zero_embeddings=[

                        "cond_frames",

                        "cond_frames_without_noise",

                    ],

                )

                model.conditioner.cpu()

                torch.cuda.empty_cache()

                # from here, dtype is fp16

                for k in ["crossattn", "concat"]:

                    uc[k] = repeat(uc[k], "b ... -> b t ...", t=num_frames)

                    uc[k] = rearrange(uc[k], "b t ... -> (b t) ...", t=num_frames)

                    c[k] = repeat(c[k], "b ... -> b t ...", t=num_frames)

                    c[k] = rearrange(c[k], "b t ... -> (b t) ...", t=num_frames)

                for k in uc.keys():

                    uc[k] = uc[k].to(dtype=torch.float16)

                    c[k] = c[k].to(dtype=torch.float16)

                randn = torch.randn(shape, device=device, dtype=torch.float16)

                additional_model_inputs = {}

                additional_model_inputs["image_only_indicator"] = torch.zeros(

                    2, num_frames

                ).to(device, )

                additional_model_inputs["num_video_frames"] = batch["num_video_frames"]

                for k in additional_model_inputs:

                    if isinstance(additional_model_inputs[k], torch.Tensor):

                        additional_model_inputs[k] = additional_model_inputs[k].to(dtype=torch.float16)

                def denoiser(input, sigma, c):

                    return model.denoiser(

                        model.model, input, sigma, c, **additional_model_inputs

                    )

                samples_z = model.sampler(denoiser, randn, cond=c, uc=uc)

                samples_z.to(dtype=model.first_stage_model.dtype)

                ##

                model.en_and_decode_n_samples_a_time = decoding_t

                model.first_stage_model.to(device)

                samples_x = model.decode_first_stage(samples_z)

                samples = torch.clamp((samples_x + 1.0) / 2.0, min=0.0, max=1.0)

                model.first_stage_model.cpu()

                torch.cuda.empty_cache()

                os.makedirs(output_folder, exist_ok=True)

                base_count = len(glob(os.path.join(output_folder, "*.mp4")))

                video_path = os.path.join(output_folder, f"{base_count:06d}.mp4")

                writer = cv2.VideoWriter(

                    video_path,

                    cv2.VideoWriter_fourcc(*"MP4V"),

                    fps_id + 1,

                    (samples.shape[-1], samples.shape[-2]),

                )

                samples = embed_watermark(samples)

                if not skip_filter:

                    samples = filter(samples)

                else:

                    print("WARNING: You have disabled the NSFW/Watermark filter. Please do not expose unfiltered results in services or applications open to the public.")

                vid = (

                    (rearrange(samples, "t c h w -> t h w c") * 255)

                    .cpu()

                    .numpy()

                    .astype(np.uint8)

                )

                for frame in vid:

                    frame = cv2.cvtColor(frame, cv2.COLOR_RGB2BGR)

                    writer.write(frame)

                writer.release()

                all_out_paths.append(video_path)

    return all_out_paths
最後に、以下のコードを実行してください。
# @title Do the Run!

# @markdown Generation takes about 10 mins for 25 frames on T4 (Colab free plan). Please be patient...

# @markdown (V100 takes about 3 mins.)

import gradio as gr

import random

def infer(input_path: str, resize_image: bool, n_frames: int, n_steps: int, seed: str, decoding_t: int, fps_id: int, motion_bucket_id: int, cond_aug: float, skip_filter: bool = False) -> str:

  if seed == "random":

    seed = random.randint(0, 2**32)

  if version == "svd-xt-1-1":

    if fps_id != 6:

      print("[WARNING] svd-xt-1-1 was fine-tuned in fixed conditioning (`fps_id=6`, `motion_bucket_id=127`)! The performance may vary compared to SVD 1.0.")

    if motion_bucket_id != 127:

      print("[WARNING] svd-xt-1-1 was fine-tuned in fixed conditioning (`fps_id=6`, `motion_bucket_id=127`)! The performance may vary compared to SVD 1.0.")

  seed = int(seed)

  output_paths = sample(

    input_path=input_path,

    resize_image=resize_image,

    num_frames=n_frames,

    num_steps=n_steps,

    fps_id=fps_id,

    motion_bucket_id=motion_bucket_id,

    cond_aug=cond_aug,

    seed=seed,

    decoding_t=decoding_t,  # Number of frames decoded at a time! This eats most VRAM. Reduce if necessary.

    device=device,

    skip_filter=skip_filter,

  )

  return output_paths[0]

with gr.Blocks() as demo:

  with gr.Column():

    image = gr.Image(label="input image", type="filepath")

    resize_image = gr.Checkbox(label="resize to optimal size", value=True)

    btn = gr.Button("Run")

    with gr.Accordion(label="Advanced options", open=False):

      n_frames = gr.Number(precision=0, label="number of frames", value=num_frames)

      n_steps = gr.Number(precision=0, label="number of steps", value=num_steps)

      seed = gr.Text(value="random", label="seed (integer or 'random')",)

      decoding_t = gr.Number(precision=0, label="number of frames decoded at a time", value=2)

      fps_id = gr.Number(precision=0, label="frames per second", value=6)

      motion_bucket_id = gr.Number(precision=0, value=127, label="motion bucket id")

      cond_aug = gr.Number(label="condition augmentation factor", value=0.02)

      skip_filter = gr.Checkbox(value=False, label="skip nsfw/watermark filter")

  with gr.Column():

    video_out = gr.Video(label="generated video")

  examples = [

      ["https://user-images.githubusercontent.com/33302880/284758167-367a25d8-8d7b-42d3-8391-6d82813c7b0f.png"],

  ]

  inputs = [image, resize_image, n_frames, n_steps, seed, decoding_t, fps_id, motion_bucket_id, cond_aug, skip_filter]

  outputs = [video_out]

  btn.click(infer, inputs=inputs, outputs=outputs)

  gr.Examples(examples=examples, inputs=inputs, outputs=outputs, fn=infer)

  demo.queue().launch(debug=True, share=True, show_error=True)
上記を実行すると、以下のような画面が出てくると思います。
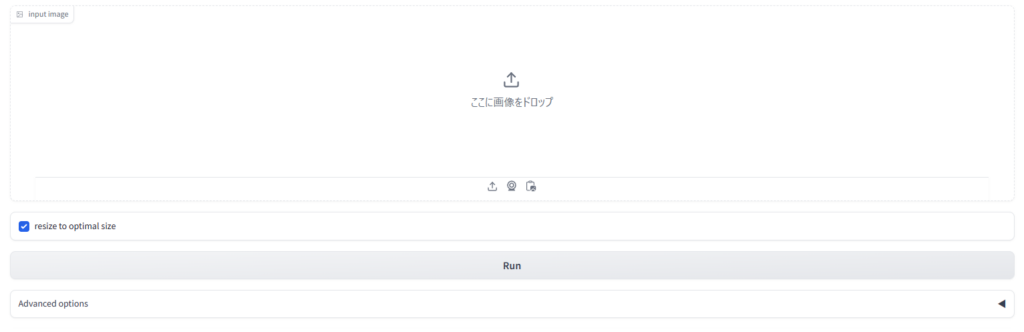
「ここに画像をドロップ」のところに任意の画像をアップロードして、「Run」をクリックすると、動画が生成されます。
主要パラメータ
Stable Video Diffusionには、複数のパラメータが存在しますが、生成動画の質を大きく左右するものは主に「動きと時間感覚」「画質・安定性」「再現性と計算資源」の3つです。
動きと時間感覚を決めるパラメータ
動画としての体感的な動きは、主にfps_idとmotion_bucket_idによって制御されます。
fps_idは、生成される動画のフレームレートに相当する内部条件で、Stable Video Diffusionの公式サンプリング例でも指定が前提とされています。
値を低く設定すると1フレームあたりの変化が大きくなり、結果としてカクついた印象の動画になります。一方で高めに設定すると、動きは滑らかになりますが、計算負荷とVRAM消費が増える傾向があります。
画質・安定性に影響するパラメータ
画質と安定性の調整で中心になるのがnum_stepsとcond_augです。
公式コードでは、ステップ数はnum_stepsとしてサンプラー設定に代入され、cond_augは条件付けに渡される値として定義されています。
一般的に、ステップ数を増やすと生成に時間がかかる一方で出力が安定することが多いです。
cond_aug は条件画像側の揺らぎを与えるための項目として実装されているので、出力のばらつきや条件画像からの離れ方に影響し得ます。ただし「必ずこうなる」と断定できるわけではないため、変更は小刻みに行うのがよいでしょう。
再現性と計算資源に関わるパラメータ
生成結果を再現するために重要なのがseedです。
Stable Video Diffusionでは、公式コード内で乱数シードを固定する実装が行われており、同一条件下での再現生成が可能になっています。
安全対策・フィルタ・ウォーターマークについて
Stable Video Diffusionの公式サンプリングコードでは、生成後の出力に対してNSFWフィルタとウォーターマーク処理が適用される設計になっています。
DeepFloydDataFilteringによるコンテンツフィルタリングと、embed_watermarkによるウォーターマーク付与が実装されており、デフォルト設定ではこれらが有効です。
また、コード上ではskip_filter=Trueを指定することでフィルタを無効化することも可能ですが、その場合は生成結果の公開や商用利用における責任が利用者側に委ねられる形になります。
実務向けの調整手順とおすすめ順序
まずfps_idとmotion_bucket_idで動画の方向性と動きの強さを決めます。その後、stepsを調整して画質と安定性を確保し、cond_augで変化量を微調整。
検証段階ではseedを固定し、条件変更の影響を正確に比較し、最後に、実行環境のVRAM制約に応じてdecoding_tを調整することで、品質と実行安定性のバランスを取るのがよいでしょう。
ローカル以外の代表的な実行方法
Stable Video Diffusionはローカル以外にも代表的な実行方法があります。ここではComfyUIとWebUI Forgeでの実行方法について解説をします。
ComfyUIでのStable Video Diffusion
では実際にComfyUIでStable Video Diffusionを使っていきたいと思います。
まずはモデルのダウンロード。14フレームの動画を作成する場合はこちら。
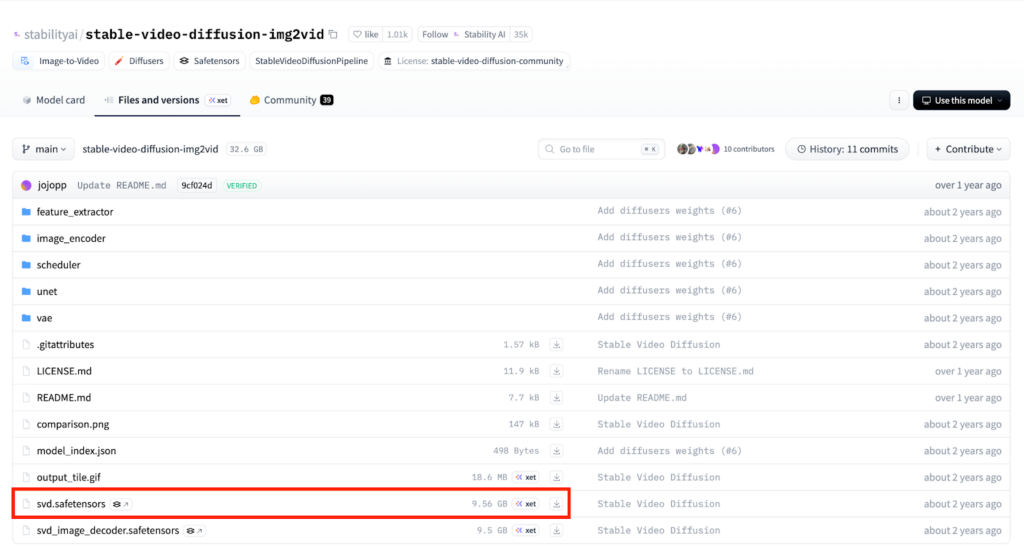
25フレームで動画を作成する場合にはこちらです。
ダウンロードしたモデルファイルは、ComfyUIのチェックポイント用フォルダに配置します。標準構成ではComfyUI/models/checkpointsに保存すれば認識されます。
モデルのダウンロードが終わったら次はワークフローをダウンロードしましょう。例が公開されているので、こちらからダウンロードするのがよいです。
ComfyUIを起動して、ダウンロードしたワークフローをインポートしましょう。
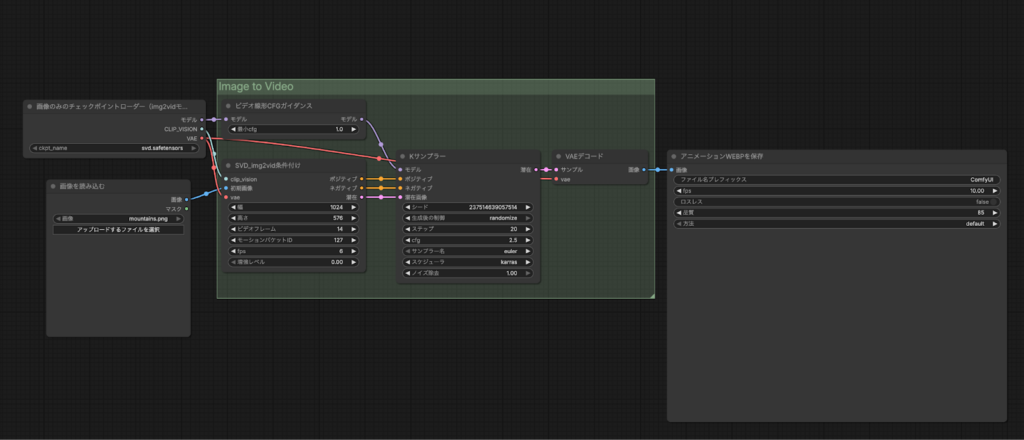
ワークフローのインポートと画像の選択が終わったら実行をクリックして完了するのを待ちます。
実際に生成された動画がこちら。
WebUI Forgeでの利用
続いてWebUI Forgeでの利用方法です。
まずはStable Diffusion WebUI Forgeをダウンロードします。
ターミナルで下記を実行します。
git clone https://github.com/lllyasviel/stable-diffusion-webui-forge.gitクローンが完了したら起動していきます。
また、ComfyUIを実行する時にダウンロードしたモデルを「forgeフォルダ」→「models」→「svd」フォルダに移動させておきましょう。
さらに拡張としてSVDが使えるように下記を入れておきます。
git clone https://github.com/licyk/sd_forge_hypertile_svd_z123 extensions/sd_forge_hypertile_svd_z123ここまでできたら、stable-diffusion-webui-forgeフォルダまで移動したら、./webui.shを実行。そうすると自動的にForgeが起動します。
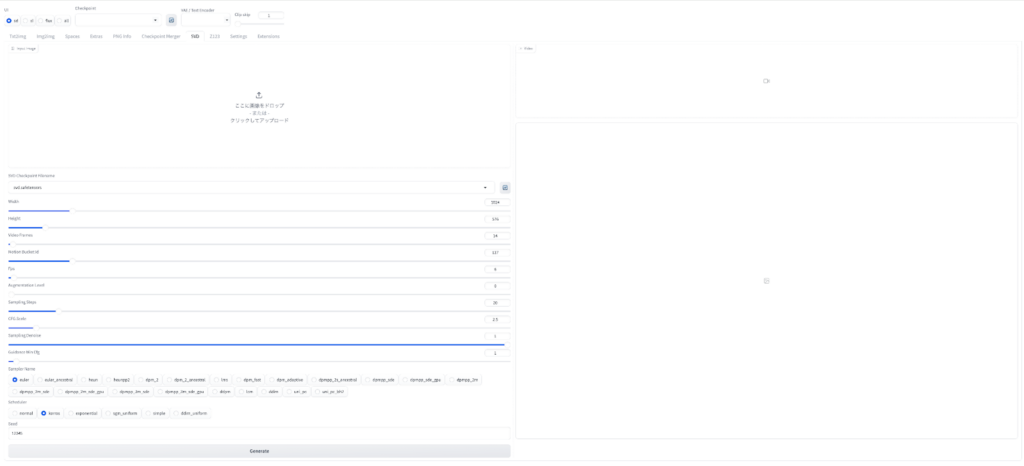
画像をアップロードして実行をします。
実際に生成された動画がこちら。
fal.aiでの実行
環境構築をするのは大変なケースも多く、まずはお試しで使ってみたい。という場合にはfal.aiを使うのがよいでしょう。fal.aiであれば煩雑な環境構築をする必要なく、画像から動画を生成することが可能です。

Stable Video Diffusionを実際に使ってみた
ここでは、冒頭の導入文にある、以下の画像を動画化してみましょう。
アップロードして、Stable Video Diffusionで動かしてみた結果が、以下の通りです。
なんか、角度が変化しているだけに感じます。
お次はSVD-XT。
うーん、クオリティは悪くないんだけど、なんかカクカクしています。
なお、ByteDanceが開発した動画生成AIについて知りたい方はこちらの記事をご覧ください。
Stable Video Diffusionの推しポイントである高品質な動画生成は本当なのか?
Stable Video Diffusionの威力を確かめるために、Runwayの「Gen-2」と比較してみます。
そこで、先ほどのStable Video Diffusionへのタスクを、Gen-2にも行わせて、品質を比較してみようと思います。Gen-2は、以下のページから利用できます。
Gen-2によって生成された動画は、以下の通りです。
細部までかなり自然ですね!ただ、人の手が歪んでいたりして、不自然な部分も見受けられました。
とはいえ、Stable Video DiffusionよりもGen-2の方が、まだまだ精度がよさそうです。
他の動画生成AIとの比較
Stable Video Diffusionは、研究起点のオープンモデルとして提供されている点が、商用SaaS型の動画生成AIと大きく異なります。
Image-to-Videoを前提とした設計で、入力画像の構図や被写体を比較的忠実に保ったまま短尺動画を生成できるのが特徴です。ここではStable Video Diffusionとそのほかの動画生成AIとの比較をしていきます。
Stable Video DiffusionとRunwayの違い
Runwayは、ブラウザ上で完結する商用動画生成サービスです。テキストから動画を生成できるほか、動画編集やエフェクト、背景除去など、完成物を作るための機能が一体化されています。
Stable Video Diffusionとの最大の違いは、設計思想と責任範囲です。
Runwayは「最終アウトプットを素早く作る」ことに最適化されており、モデル選択やパラメータ調整を意識せずに使える反面、内部挙動の細かい制御はできません。
一方でStable Video Diffusionはローカルや任意のUI上で動かせるため、入力画像の作り方や後処理を含めて自由度が高く、制作フローに組み込みやすい構成です。
Stable Video DiffusionとPikaの違い
Pikaはテキスト指示による動画生成を強みとするサービスで、キャラクターやシーンを自然言語で操作できる点が特徴です。
Pikaは「テキストで動画を作りたい」というニーズに応える設計になっており、発想段階のラフ動画やSNS向け短編映像を素早く作る用途に向いています。
Stable Video Diffusionはテキスト制御を前提としていないため、Pikaのようなプロンプト主導の操作感はありません。
その代わり、既存のビジュアル素材を起点に、動きだけを付与する用途では安定しやすく、実写素材やイラスト素材との相性が良い構成です。
用途別の選び分け
どの動画生成AIが適しているかは、「何を起点に」「どこまで作り込みたいか」で決まります。
アイデア出しやSNS向け動画を素早く作りたい場合は、RunwayやPikaのようなSaaS型が効率的でしょう。
一方で、すでに静止画素材や世界観が固まっていて、その延長として短い動画表現を作りたい場合には、Stable Video Diffusionが向いています。
Image-to-Videoに特化しているため、被写体保持や構図の一貫性を重視する制作フローと相性が良く、ローカル実行による柔軟な運用も可能です。
Stability AIの動画系ラインナップの進化
Stable Video Diffusionの公開以降、Stability AIは動画・3D領域へとモデル展開を広げています。ここでは、公式に発表・公開されている関連モデルを整理します。
Stable Video 3D
Stable Video 3Dは、単一画像から複数視点の画像列を生成するモデルです。名前にVideoが含まれていますが、目的は動画生成というよりも3D再構成。
入力された1枚の画像から異なるカメラ角度のビューを生成し、それを3Dアセット生成やNeRF系ワークフローに活用する設計です。つまり、時間軸ではなく「視点軸」を拡張するモデルと言えます。
動画生成AIで人物の動きを再現したい方は、以下の記事もご覧ください。

Stable Video 4D
Stable Video 4Dは、単一動画から動的な3Dシーンを再構成する研究モデルです。これはさらに一歩進み、「時間+3D空間」を同時に扱う4D表現を目指しています。
入力された動画から、被写体や空間の動きを含む三次元的な再構成を行う設計で、従来の2D動画生成とは方向性が異なります。映像を作るモデルというよりも、映像を立体的に復元する研究プロジェクトに近い立ち位置です。
手軽に使える無料の動画生成AIを探している方は、以下の記事もご覧ください。

Stable Video Diffusionの注意点
Stable Video Diffusionを使う上での注意点は次の2つです。
- GPUの使いすぎ
- 著作権
Stable Video Diffusionを使う際に、google colaboratoryで実装される時にはGPUの使いすぎに注意が必要です。動画を生成するにはかなりの時間がかかり、google colaboratoryは時間経過に応じてリソースが消費されます。
そのため、気づいたらリソースが空になってしまったということにならないように、注意しましょう。
また、Stable Video Diffusionで生成された動画の著作権自体は問題ありませんが、使用した画像に関しては著作権の問題が発生することがあります。
クリエイターが作成した画像を使ってしまった、企業のロゴやキャラクターの画像を使って動画を生成してしまった、ということにならないよう、元の画像の著作権については注意しておくのがいいでしょう。
活用事例
Stable Diffusionを使った事例として、コカコーラのCMがあります。
KDDIのCMでもStable Diffusionが活用されています。
近年では、CMに生成AIを活用する事例が増えてきており、今後もますます増加すると考えられます。
生成AIを使ってCMを作ることで、コストが下がり、生成AIを使わなかったときに比べて短時間で作成することができます。
また、非現実的な映像を実現することもできるので、視聴者に対してよりインパクトを与えることも可能。
StableVideo Diffusionに関するQ&A
ここではStable Video Diffusionを使う上で、よくある質問をまとめておきます。
StableVideo Diffusionで簡単に静止画から動画を生成してみましょう
Stable Video Diffusion(SVD)は、Stability AIによって開発されたImage2Videoモデルの一種で、入力画像から動画を生成できます。
誰でも無料で利用可能できるAIツールであり、画像を入力すれば、その画像の内容に即した動画が生成されるのです。使い方は簡単で、本記事のコードをそのまま実行すれば、実行できます。
実際に試したところ、角度が動いているだけだったり、カクカクしていたりしました。加えて、比較検証したところ、やはりStable Video DiffusionよりもGen-2の方が、まだまだ精度がよさそうです。
数年後には、『アーサー・C・クラークの小説』のように、誰でもアーティストになれる時代が来るかもしれないですね。
最後に
いかがだったでしょうか?
Stable Video Diffusionの登場により、静止画から動画生成のハードルが大きく下がりました。ビジュアルコンテンツ制作の新たな可能性を、貴社のプロダクトや事業にどう活かせるか、最適な活用方法を検討してみましょう。
「生成AIで新しいプロダクトを作りたい」「もっと本格的に生成AIを業務に組み込みたい」とお考えの方は、ぜひ株式会社WEELにご相談ください。
開発実績として、
・新規事業室での「リサーチ」「分析」「事業計画検討」を70%自動化するAIエージェント
・社内お問い合わせの1次回答を自動化するRAG型のチャットボット
・過去事例や最新情報を加味して、10秒で記事のたたき台を作成できるAIプロダクト
・お客様からのメール対応の工数を80%削減したAIメール
・サーバーやAI PCを活用したオンプレでの生成AI活用
・生徒の感情や学習状況を踏まえ、勉強をアシストするAIアシスタント
などの開発実績がございます。
生成AIを活用したプロダクト開発の支援内容は、以下のページでも詳しくご覧いただけます。
➡︎株式会社WEELのサービスを詳しく見る。
アイデア段階でも構いません。まずは無料相談でお気軽にご相談ください。
➡︎生成AIを活用したプロダクト開発・業務効率化について相談する

「生成AIを社内で活用したい」「生成AIの事業をやっていきたい」という方に向けて、生成AI社内セミナー・勉強会をさせていただいております。
セミナー内容や料金については、ご相談ください。
また、サービス紹介資料もご用意しておりますので、併せてご確認ください。