
【Autogen】LLMマルチエージェントフレームワークで複雑なタスクも自動解決!概要から使い方まで徹底解説

皆さん、AutoGenというLLMのツールを知っていますか?「複数のAIエージェント」が相互に会話しながらタスクを解決するツールで、LLMの精度を上げてくれるんです。
現在は高度なタスクを解くのに、まだシングルエージェントでしかLLMを動かしていませんよね。AutoGenを使えば、マルチエージェントを使うことができるので、そんな難しいことも可能になります。
AutoGenはあのMicrosoftが開発に関わっており、注目が集まっています。Githubのスター数は5500以上。
このツール、一躍話題になったBabyAGIよりも凄いんじゃないでしょうか…ワクワク
というわけで、今回はそんなAutoGenについて、概要から具体的な使い方まで解説します。本記事を読むことで、AutoGenを使った「マルチエージェントによるLLMの精度向上」を容易に実現できます。
ぜひ最後までご覧ください。
\生成AIを活用して業務プロセスを自動化/
AutoGenの概要
AutoGenは、「複数のAIエージェント」が相互に会話しながらタスクを解決するLLMのツールです。Microsoft、Penn State University、Washington大学の共同研究によって開発されました。ここで言うエージェントとは、ロボットのようなものだと考えてください。
GPT-4のようなLLMは確かに精度が高いです。しかし、そのような高精度LLMでもシングルエージェントだと、複雑なタスクの処理を解くことが難しい場合があります。
そんな時に、このAutoGenを使いロボットたちが協力することで、難しい処理もできるようになるのです。
AutoGenを使うことで、複数のAIエージェントを組み合わせることができたり、役割に応じてタスクをAIエージェントに割り振ることができるようになります。
AIエージェントの業務活用方法については、以下の記事を参考にしてください。


AutoGenの料金体系
AutoGenはOSSであるため、無料で利用可能です。
なお、人間と会話をしながらタスクを終わらせていくAIエージェントについて知りたい方はこちらをご覧ください。

AutoGenの使い方
AutoGenのインストールには、Pythonバージョン3.8以上が必要でpipを使ってインストールできます。
Githubページはこちらです。
今回はGoogle Colabを使います。Google Colabを開いたら以下のコマンドを実行して、インストールをしましょう。
!pip install pyautogenAutoGenの利用用途としては、主に2つあります。これら2つの使い方については、使用例がコード付きで公式ページに公開されています。具体的な利用用途などの情報は、以下の表を参考にしてください。
| 利用用途 | 内容 | 公式ページのExapmleリンク |
|---|---|---|
| Multi-Agent Conversation Framework | 複数のエージェントが協力して、高度なタスクを実行 | AutoGen – Automated Multi Agent Chat |
| Enhanced LLM Inferences | ChatGPTやGPT-4のようなLLMの能力を最大化する | AutoGen – Tune GPT Models |
上記の2つの利用用途における使用例について、次のセクションで解説します。
なお、道理性、倫理性を備えたAIエージェントについて知りたい方はこちらをご覧ください。

AutoGenを実際に使ってみた
ここでは、実際にAutoGenを使ってみます。具体的には、以下の2つのことを試してみました。
- Multi-Agent Conversation Framework:コード生成と実行+デバッグによるタスク解決
- Enhanced LLM Inferences:OpenAIのモデルをチューニング
Multi-Agent Conversation Framework
ここでは、AssistantAgentとUserProxyAgentという2つのエージェントを使用してコードを記述し、コードを実行する方法を説明します。この2つのエージェントの役割は、以下の通りです。
- AssistantAgent:与えられたタスクに対してPythonを書く
- UserProxyAgent:Pythonの実行や、AssistantAgentへのフィードバック
以下のGitHubページを参考に、実行していきます。
まずは、以下のコマンドを実行して、インストールしましょう。
!pip install pyautogen~=0.1.0次に、OpenAIのモデルを使えるようにしておきます。ここでは、GPT-4を利用します。
import autogen

config_list = [

    {

        'model': 'gpt-4',

        'api_key': 'OPEN AI API_KEY',

    }

]公式のコードにならって、AssistantAgentに「What date is today? Compare the year-to-date gain for META and TESLA.」という質問を投げかけてみましょう。
# create an AssistantAgent named "assistant"

assistant = autogen.AssistantAgent(

    name="assistant",

    llm_config={

        "seed": 42,  # seed for caching and reproducibility

        "config_list": config_list,  # a list of OpenAI API configurations

        "temperature": 0,  # temperature for sampling

    },  # configuration for autogen's enhanced inference API which is compatible with OpenAI API

)

# create a UserProxyAgent instance named "user_proxy"

user_proxy = autogen.UserProxyAgent(

    name="user_proxy",

    human_input_mode="NEVER",

    max_consecutive_auto_reply=10,

    is_termination_msg=lambda x: x.get("content", "").rstrip().endswith("TERMINATE"),

    code_execution_config={

        "work_dir": "coding",

        "use_docker": False,  # set to True or image name like "python:3" to use docker

    },

)

# the assistant receives a message from the user_proxy, which contains the task description

user_proxy.initiate_chat(

    assistant,

    message="""What date is today? Compare the year-to-date gain for META and TESLA.""",

)
すると、以下のように出力されました。
user_proxy (to assistant):

What date is today? Compare the year-to-date gain for META and TESLA.

--------------------------------------------------------------------------------

assistant (to user_proxy):

First, let's get the current date. We can do this using Python's built-in datetime module.

```python

# python code

import datetime

# Get the current date

current_date = datetime.date.today()

print("Today's date is:", current_date)

```

Next, we need to get the year-to-date (YTD) gain for META (Facebook) and TESLA. We can do this by using the yfinance library in Python, which allows us to download stock market data from Yahoo Finance.

First, we need to install the yfinance library. You can do this by running the following command in your terminal:

```sh

# shell script

pip install yfinance

```

After installing yfinance, we can use it to get the YTD gain for META and TESLA. Here's how you can do it:

```python

# python code

import yfinance as yf

# Get the data for the stock Apple by specifying the stock ticker, start date, and end date

meta_data = yf.download('META', start='2022-01-01', end=current_date)

tesla_data = yf.download('TSLA', start='2022-01-01', end=current_date)

# Calculate the YTD gain for META and TESLA

meta_ytd_gain = ((meta_data['Close'][-1] - meta_data['Close'][0]) / meta_data['Close'][0]) * 100

tesla_ytd_gain = ((tesla_data['Close'][-1] - tesla_data['Close'][0]) / tesla_data['Close'][0]) * 100

print("META's YTD gain is: ", meta_ytd_gain, "%")

print("TESLA's YTD gain is: ", tesla_ytd_gain, "%")

```

This code will print out the YTD gain for META and TESLA. The YTD gain is calculated by subtracting the closing price of the stock on the first day of the year from the closing price on the current day, dividing by the closing price on the first day of the year, and then multiplying by 100 to get a percentage.

--------------------------------------------------------------------------------

>>>>>>>> EXECUTING CODE BLOCK 0 (inferred language is python)...

>>>>>>>> EXECUTING CODE BLOCK 1 (inferred language is sh)...

>>>>>>>> EXECUTING CODE BLOCK 2 (inferred language is python)...

user_proxy (to assistant):

exitcode: 1 (execution failed)

Code output:

Today's date is: 2023-10-05

Requirement already satisfied: yfinance in /usr/local/lib/python3.10/dist-packages (0.2.30)

Requirement already satisfied: pandas>=1.3.0 in /usr/local/lib/python3.10/dist-packages (from yfinance) (1.5.3)

Requirement already satisfied: numpy>=1.16.5 in /usr/local/lib/python3.10/dist-packages (from yfinance) (1.23.5)

Requirement already satisfied: requests>=2.31 in /usr/local/lib/python3.10/dist-packages (from yfinance) (2.31.0)

Requirement already satisfied: multitasking>=0.0.7 in /usr/local/lib/python3.10/dist-packages (from yfinance) (0.0.11)

Requirement already satisfied: lxml>=4.9.1 in /usr/local/lib/python3.10/dist-packages (from yfinance) (4.9.3)

Requirement already satisfied: appdirs>=1.4.4 in /usr/local/lib/python3.10/dist-packages (from yfinance) (1.4.4)

Requirement already satisfied: pytz>=2022.5 in /usr/local/lib/python3.10/dist-packages (from yfinance) (2023.3.post1)

Requirement already satisfied: frozendict>=2.3.4 in /usr/local/lib/python3.10/dist-packages (from yfinance) (2.3.8)

Requirement already satisfied: peewee>=3.16.2 in /usr/local/lib/python3.10/dist-packages (from yfinance) (3.16.3)

Requirement already satisfied: beautifulsoup4>=4.11.1 in /usr/local/lib/python3.10/dist-packages (from yfinance) (4.11.2)

Requirement already satisfied: html5lib>=1.1 in /usr/local/lib/python3.10/dist-packages (from yfinance) (1.1)

Requirement already satisfied: soupsieve>1.2 in /usr/local/lib/python3.10/dist-packages (from beautifulsoup4>=4.11.1->yfinance) (2.5)

Requirement already satisfied: six>=1.9 in /usr/local/lib/python3.10/dist-packages (from html5lib>=1.1->yfinance) (1.16.0)

Requirement already satisfied: webencodings in /usr/local/lib/python3.10/dist-packages (from html5lib>=1.1->yfinance) (0.5.1)

Requirement already satisfied: python-dateutil>=2.8.1 in /usr/local/lib/python3.10/dist-packages (from pandas>=1.3.0->yfinance) (2.8.2)

Requirement already satisfied: charset-normalizer<4,>=2 in /usr/local/lib/python3.10/dist-packages (from requests>=2.31->yfinance) (3.2.0)

Requirement already satisfied: idna<4,>=2.5 in /usr/local/lib/python3.10/dist-packages (from requests>=2.31->yfinance) (3.4)

Requirement already satisfied: urllib3<3,>=1.21.1 in /usr/local/lib/python3.10/dist-packages (from requests>=2.31->yfinance) (2.0.5)

Requirement already satisfied: certifi>=2017.4.17 in /usr/local/lib/python3.10/dist-packages (from requests>=2.31->yfinance) (2023.7.22)

Traceback (most recent call last):

  File "", line 5, in <module>

    meta_data = yf.download('META', start='2022-01-01', end=current_date)

NameError: name 'current_date' is not defined

--------------------------------------------------------------------------------

assistant (to user_proxy):

I apologize for the confusion. The error occurred because the `current_date` variable was defined in a separate code block and is not available in the subsequent code block.

Let's combine the two code blocks into one to solve this issue. Here's the corrected code:

```python

# python code

import datetime

import yfinance as yf

# Get the current date

current_date = datetime.date.today()

print("Today's date is:", current_date)

# Get the data for the stock Apple by specifying the stock ticker, start date, and end date

meta_data = yf.download('META', start='2022-01-01', end=current_date)

tesla_data = yf.download('TSLA', start='2022-01-01', end=current_date)

# Calculate the YTD gain for META and TESLA

meta_ytd_gain = ((meta_data['Close'][-1] - meta_data['Close'][0]) / meta_data['Close'][0]) * 100

tesla_ytd_gain = ((tesla_data['Close'][-1] - tesla_data['Close'][0]) / tesla_data['Close'][0]) * 100

print("META's YTD gain is: ", meta_ytd_gain, "%")

print("TESLA's YTD gain is: ", tesla_ytd_gain, "%")

```

This code will print out the current date and the YTD gain for META and TESLA.

--------------------------------------------------------------------------------

>>>>>>>> EXECUTING CODE BLOCK 0 (inferred language is python)...

user_proxy (to assistant):

exitcode: 0 (execution succeeded)

Code output:

Today's date is: 2023-10-05

[*********************100%%**********************]  1 of 1 completed

[*********************100%%**********************]  1 of 1 completed

META's YTD gain is:  -9.735931098460608 %

TESLA's YTD gain is:  -34.69802698965883 %

--------------------------------------------------------------------------------

assistant (to user_proxy):

Based on the output, the year-to-date (YTD) gain for META (Facebook) is approximately -9.74%, indicating a decrease in value. On the other hand, the YTD gain for TESLA is approximately -34.70%, which also indicates a decrease in value.

Please note that these values are based on the closing prices of the stocks from the start of the year 2023 to the date of October 5, 2023. The negative YTD gain means that the stock's value has decreased since the start of the year.

TERMINATE
上記の結果を見ると、所々にエラーメッセージがあり、それをAssistantAgentが修正している箇所が見られます。
では、上記のテスラとMetaの株価をプロットしてみましょう。
# followup of the previous question

user_proxy.send(

    recipient=assistant,

    message="""Plot a chart of their stock price change YTD and save to stock_price_ytd.png.""",

)
ここでも、下記のように2つのエージェントがやり取りをしているのが分かります。
user_proxy (to assistant):

Plot a chart of their stock price change YTD and save to stock_price_ytd.png.

--------------------------------------------------------------------------------

assistant (to user_proxy):

We can use the matplotlib library in Python to plot the chart of their stock price change YTD. If you haven't installed matplotlib yet, you can install it using the following command:

```sh

# shell script

pip install matplotlib

```

After installing matplotlib, you can use the following code to plot the chart and save it to a file:

```python

# python code

import matplotlib.pyplot as plt

# Plot the closing prices of META and TESLA

plt.figure(figsize=(14, 7))

plt.plot(meta_data['Close'], label='META')

plt.plot(tesla_data['Close'], label='TESLA')

# Add title and labels

plt.title('Stock Price Change YTD for META and TESLA')

plt.xlabel('Date')

plt.ylabel('Closing Price (USD)')

# Add legend

plt.legend()

# Save the plot to a file

plt.savefig('stock_price_ytd.png')

```

This code will create a line plot of the closing prices of META and TESLA stocks from the start of the year to the current date. The plot is then saved to a file named 'stock_price_ytd.png'.

--------------------------------------------------------------------------------

>>>>>>>> EXECUTING CODE BLOCK 0 (inferred language is sh)...

>>>>>>>> EXECUTING CODE BLOCK 1 (inferred language is python)...

user_proxy (to assistant):

exitcode: 1 (execution failed)

Code output:

Requirement already satisfied: matplotlib in /usr/local/lib/python3.10/dist-packages (3.7.1)

Requirement already satisfied: contourpy>=1.0.1 in /usr/local/lib/python3.10/dist-packages (from matplotlib) (1.1.1)

Requirement already satisfied: cycler>=0.10 in /usr/local/lib/python3.10/dist-packages (from matplotlib) (0.12.0)

Requirement already satisfied: fonttools>=4.22.0 in /usr/local/lib/python3.10/dist-packages (from matplotlib) (4.43.0)

Requirement already satisfied: kiwisolver>=1.0.1 in /usr/local/lib/python3.10/dist-packages (from matplotlib) (1.4.5)

Requirement already satisfied: numpy>=1.20 in /usr/local/lib/python3.10/dist-packages (from matplotlib) (1.23.5)

Requirement already satisfied: packaging>=20.0 in /usr/local/lib/python3.10/dist-packages (from matplotlib) (23.1)

Requirement already satisfied: pillow>=6.2.0 in /usr/local/lib/python3.10/dist-packages (from matplotlib) (9.4.0)

Requirement already satisfied: pyparsing>=2.3.1 in /usr/local/lib/python3.10/dist-packages (from matplotlib) (3.1.1)

Requirement already satisfied: python-dateutil>=2.7 in /usr/local/lib/python3.10/dist-packages (from matplotlib) (2.8.2)

Requirement already satisfied: six>=1.5 in /usr/local/lib/python3.10/dist-packages (from python-dateutil>=2.7->matplotlib) (1.16.0)

Traceback (most recent call last):

  File "", line 6, in <module>

    plt.plot(meta_data['Close'], label='META')

NameError: name 'meta_data' is not defined

--------------------------------------------------------------------------------

assistant (to user_proxy):

I apologize for the confusion. The error occurred because the `meta_data` and `tesla_data` variables were defined in a separate code block and are not available in the subsequent code block.

Let's combine the two code blocks into one to solve this issue. Here's the corrected code:

```python

# python code

import datetime

import yfinance as yf

import matplotlib.pyplot as plt

# Get the current date

current_date = datetime.date.today()

# Get the data for the stock Apple by specifying the stock ticker, start date, and end date

meta_data = yf.download('META', start='2022-01-01', end=current_date)

tesla_data = yf.download('TSLA', start='2022-01-01', end=current_date)

# Plot the closing prices of META and TESLA

plt.figure(figsize=(14, 7))

plt.plot(meta_data['Close'], label='META')

plt.plot(tesla_data['Close'], label='TESLA')

# Add title and labels

plt.title('Stock Price Change YTD for META and TESLA')

plt.xlabel('Date')

plt.ylabel('Closing Price (USD)')

# Add legend

plt.legend()

# Save the plot to a file

plt.savefig('stock_price_ytd.png')

```

This code will create a line plot of the closing prices of META and TESLA stocks from the start of the year to the current date. The plot is then saved to a file named 'stock_price_ytd.png'.

--------------------------------------------------------------------------------
上記の最後のコード部分によって、プロットのpngファイルが作成されました。以下のコードを実行して、pngファイルを表示してみましょう。
from IPython.display import Image

Image(filename='coding/stock_price_ytd.png')
出力は以下の通りです。

このように、AssistantAgentに対してタスクを自然言語で与えるだけで、AIが自動で実行してくれます。
Enhanced LLM Inferences
次にGPTを、数学の問題に強くなってもらうためにチューニングします。数学のデータセットを使い、それらのモデルの数学の問題解決を測定します。
まずは、以下のコマンドを実行して、インストールをしてください。
!pip install "pyautogen[blendsearch]" datasetsOpenAIのAPI Keyを設定します。’OPEN AI API_KEY’の中は各自で取得したAPI_KEYを入力してください。
import autogen

config_list = [

    {'api_key': 'OPEN AI API_KEY'}

]
次に、以下のコードを実行して数学のデータセットをロードします。
import datasets
seed = 41
data = datasets.load_dataset("competition_math")
train_data = data["train"].shuffle(seed=seed)
test_data = data["test"].shuffle(seed=seed)
n_tune_data = 20
tune_data = [
{
"problem": train_data[x]["problem"],
"solution": train_data[x]["solution"],
}
for x in range(len(train_data)) if train_data[x]["level"] == "Level 2" and train_data[x]["type"] == "Algebra"
][:n_tune_data]
test_data = [
{
"problem": test_data[x]["problem"],
"solution": test_data[x]["solution"],
}
for x in range(len(test_data)) if test_data[x]["level"] == "Level 2" and test_data[x]["type"] == "Algebra"
]
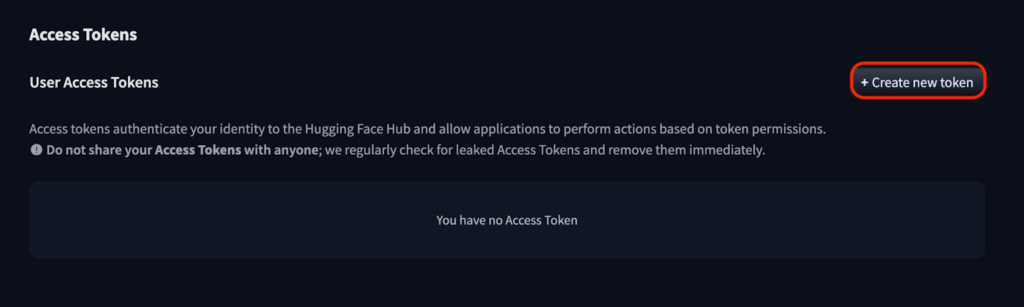
print(len(tune_data), len(test_data))ここで以下のエラーが出た方は、Hugging Face Hub上の「competition_math」データセットの認証が必要なので以下のコードを実行してください。
エラー文
ConnectionError: Couldn't reach https://huggingface.co/datasets/competition_math/resolve/main/competition_math.py (ConnectionError('Unauthorized for URL https://huggingface.co/datasets/competition_math/resolve/main/competition_math.py. Please use the parameter `token=True` after logging in with `huggingface-cli login`'))対処法
- アクセストークン取得
- https://huggingface.co/settings/tokens へアクセス
- 「Create new token」でトークンを取得し、クリップボードにコピー
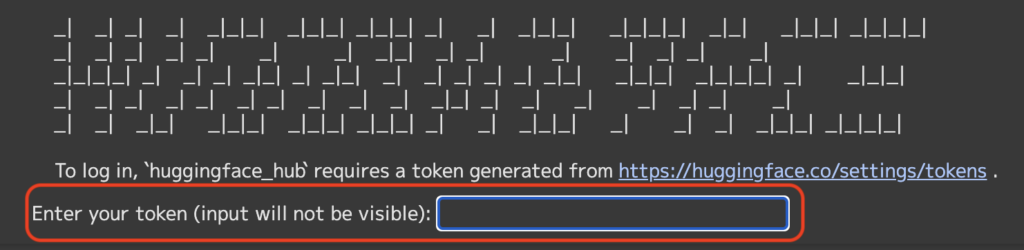
- GoogleColab上で以下コードを実行
!pip install huggingface_hub

from huggingface_hub import notebook_login

notebook_login()

!pip install huggingface_hub

!huggingface-cli login- 以下のような出力がされたら、先ほどコピーしたトークンをペーストしEnter
以上でエラーを解消できるかと思います。
それでは、まずはここで解く数学の問題例を見ていきましょう。以下のコードを実行してください。
print(tune_data[1]["problem"])問題例
If $3+a=4-b$ and $4+b=7+a$, what is $3-a$?「3+a=4-b, 4+b=7+aであれば, 3-aはいくらになる?」という連立方程式を解く問題です。このような問題が、ざっと20問ほどあり、GPTに解かせるイメージです。
また、上記の問題例の回答を見るには以下のコードを実行します。
print(tune_data[1]["solution"])回答例
First we begin by solving the system of equations \begin{align*}

3+a&=4-b, \\

4+b&=7+a.

\end{align*}Adding the two equations, we get $3+a+4+b=4-b+7+a$, which simplifies to $7+a+b=11+a-b$. Cancelling $a$ from both sides, we get $7+b=11-b$. Solving for $b$, we find that $b=2$.

Plugging this into the first equation above, we obtain $3+a=4-2$. Hence $a=-1$ and $3-a=\boxed{4}$.
今回は上記のような数学問題をGPTに解かせるために、エージェントにGPTのパラメータを調節してもらいましょう。
from autogen.math_utils import eval_math_responses

autogen.ChatCompletion.set_cache(seed)

import logging

prompts = ["{problem} Solve the problem carefully. Simplify your answer as much as possible. Put the final answer in \\boxed{{}}."]

config, analysis = autogen.ChatCompletion.tune(

    data=tune_data,  # the data for tuning

    metric="success_vote",  # the metric to optimize

    mode="max",  # the optimization mode

    eval_func=eval_math_responses,  # the evaluation function to return the success metrics

    # log_file_name="logs/math.log",  # the log file name

    inference_budget=0.02,  # the inference budget (dollar per instance)

    optimization_budget=1,  # the optimization budget (dollar in total)

    # num_samples can further limit the number of trials for different hyperparameter configurations;

    # -1 means decided by the optimization budget only

    num_samples=20,

    model="gpt-3.5-turbo",  # comment to tune both gpt-3.5-turbo and gpt-4

    prompt=prompts,  # the prompt templates to choose from

    # stop="###",  # the stop sequence

    config_list=config_list,  # the endpoint list

    allow_format_str_template=True,  # whether to allow format string template

    # logging_level=logging.INFO,  # the logging level

)
下記のコードで調節結果を見ることができます。
print("optimized config", config)

print("best result on tuning data", analysis.best_result)
AutoGenによる調節結果
optimized config {'max_tokens': 375, 'n': 44, 'prompt': '{problem} Solve the problem carefully. Simplify your answer as much as possible. Put the final answer in \\boxed{{}}.', 'model': 'gpt-3.5-turbo', 'allow_format_str_template': True, 'temperature': 0.7466815201029384}

best result on tuning data {'expected_success': 0.9818164607828072, 'success': 1.0, 'success_vote': 0.95, 'voted_answer': 'To find the number of integers in the sequence, we need to find when each term becomes less than 1. \n\nStarting with 6075, we divide by 3 to get $\\frac{6075}{3} = 2025$. Since 2025 is an integer, it is included in the sequence.\n\nDividing 2025 by 3, we get $\\frac{2025}{3} = 675$. Again, 675 is an integer, so it is included in the sequence.\n\nIf we divide 675 by 3, we get $\\frac{675}{3} = 225$. 225 is an integer, so it is included in the sequence.\n\nDividing 225 by 3, we get $\\frac{225}{3} = 75$. 75 is an integer, so it is included in the sequence.\n\nDividing 75 by 3, we get $\\frac{75}{3} = 25$. 25 is an integer, so it is included in the sequence.\n\nIf we divide 25 by 3, we get $\\frac{25}{3} \\approx 8.3333$, which is not an integer. Thus, 25 is the last integer in the sequence.\n\nThere are a total of $\\boxed{6}$ integers in the sequence.', 'votes': 34.85, 'total_cost': 0.463802, 'cost': 0.27552199999999993, 'inference_cost': 0.01310685, 'training_iteration': 0, 'config': {'temperature_or_top_p': {'temperature': 0.7466815201029384}, 'max_tokens': 375, 'n': 44, 'prompt': 0, 'model': 'gpt-3.5-turbo', 'allow_format_str_template': True}, 'config/temperature_or_top_p': {'temperature': 0.7466815201029384}, 'config/max_tokens': 375, 'config/n': 44, 'config/prompt': 0, 'config/model': 'gpt-3.5-turbo', 'config/allow_format_str_template': True, 'experiment_tag': 'exp', 'time_total_s': 201.2768588066101}
調節した設定をGPTに適用しましょう。
response = autogen.ChatCompletion.create(context=tune_data[1], config_list=config_list, **config)

metric_results = eval_math_responses(autogen.ChatCompletion.extract_text(response), **tune_data[1])

print("response on an example data instance:", response)

print("metric_results on the example data instance:", metric_results)
最後に、以下のソコードで調節済みのGPTでテストデータの評価をすることができます。
result = autogen.ChatCompletion.test(test_data, logging_level=logging.INFO, config_list=config_list, **config)

print("performance on test data with the tuned config:", result)
調節されていないデフォルトのGPTと、精度を比較してみましょう。
default_config = {"model": 'gpt-4', "prompt": prompts[0], "allow_format_str_template": True}

default_result = autogen.ChatCompletion.test(test_data, config_list=config_list, **default_config)

print("performance on test data from gpt-4 with a default config:", default_result)

print("tuned config succeeds in {:.1f}% test cases".format(result["success_vote"] * 100))

print("untuned config succeeds in {:.1f}% test cases".format(default_result["success_vote"] * 100))
結果は以下の通りになりました。
tuned config succeeds in 93.5% test cases

untuned config succeeds in 67.2% test cases
調節済みの方が93.5%で、未調節が67.2%という結果に。これにより、AutoGenを用いたAIモデルのパラメータ調節を行うことで、モデルの精度を上げることができます。
マルチエージェント構成に使えるツールを比較したい方は、以下の記事もご覧ください。

AutoGenの推しポイントである複雑なタスクの実行は本当なのか?
以下の3つに対して、「Multi-Agent Conversation Framework」を用いた「自動コーディング」による、TeslaとMetaの株価のプロットの様子を、比較してみましょう。
- AutoGen
- BabyAGI
- Camel
プロンプトは「What date is today? Compare the year-to-date gain for META and TESLA.」です。
まずはBabyAGIの実装です。
下記のコードで必要なパッケージのインストールを行いましょう。
# パッケージのインストール

!git clone https://github.com/yoheinakajima/babyagi.git

%cd babyagi

!pip install -r requirements.txt
次に、環境変数の準備を行います。Objectiveには、プロンプトの内容を入れました。
# 環境変数の準備

import os

# API CONFIG

os.environ["OPENAI_API_KEY"] = "<OpenAIのAPIキー>"

os.environ["OPENAI_API_MODEL"] = "gpt-3.5-turbo"

os.environ["PINECONE_API_KEY"] = "<PineconeのAPIキー>"

os.environ["PINECONE_ENVIRONMENT"] = "us-west1-gcp"

os.environ["TABLE_NAME"] = "test-table"

os.environ["BABY_NAME"] = "BabyAGI"

os.environ["OBJECTIVE"] = "What date is today? Compare the year-to-date gain for META and TESLA. And plot a chart of their stock price change YTD and save to stock_price_ytd.png."

os.environ["INITIAL_TASK"] = "First, let's get the current date. We can do this using Python's built-in datetime module."

os.environ["DOTENV_EXTENSIONS"] = ""

os.environ["ENABLE_COMMAND_LINE_ARGS"] = "false"
では、実行してみましょう。
# BabyAGIの実行

!python babyagi.py
足りないパッケージのインストール等も、AutoGenと同様に行ってくれていますね。ただ、プロットはできなかったです。自動プログラミングとデバックは苦手なのかな。
手動で停止しないと実行し続けるので、注意してください。
続いて、Camelの実装です。
まずはパッケージインストール。
!pip install git+https://github.com/camel-ai/camel.git@v0.1.0次にOpenAIのAPI Keyの設定。
import openai

openai.api_key = ""
そして実行。
from colorama import Fore

from camel.agents import RolePlaying

from camel.utils import print_text_animated

task_prompt = "What date is today? Compare the year-to-date gain for META and TESLA. And plot a chart of their stock price change YTD and save to stock_price_ytd.png."

print(Fore.YELLOW + f"Original task prompt:\n{task_prompt}\n")

role_play_session = RolePlaying("Computer Programmer", task_prompt)

print(Fore.CYAN + f"Specified task prompt:\n{role_play_session.task_prompt}\n")

chat_turn_limit, n = 10, 0

assistant_msg, _ = role_play_session.init_chat()

while n < chat_turn_limit:

    n += 1

    (assistant_msg, _, _), (user_msg, _, _) = role_play_session.step(assistant_msg)

    print_text_animated(Fore.BLUE + f"AI User:\n\n{user_msg.content}\n\n")

    print_text_animated(Fore.GREEN + f"AI Assistant:\n\n{assistant_msg.content}\n\n")

    if "<CAMEL_TASK_DONE>" in user_msg.content:

        break
結果は次の通り(最初の方は省略)。
Original task prompt:

What date is today? Compare the year-to-date gain for META and TESLA. And plot a chart of their stock price change YTD and save to stock_price_ytd.png.

AI Assistant:

Solution:

To save the line chart as "stock_price_ytd.png" in the current working directory, we can use the `plt.savefig()` function from matplotlib.

Here is the updated code to save the line chart:

```python

import datetime

import matplotlib.pyplot as plt

# Assuming we have the stock prices for META and TESLA stored in lists

meta_prices = [100, 110, 120, 130, 140]  # Replace with actual META stock prices

tesla_prices = [200, 210, 220, 230, 240]  # Replace with actual TESLA stock prices

# Get the current date

current_date = datetime.date.today()

# Get the dates for the beginning of the year until the current date

dates = [datetime.date(current_date.year, 1, 1) + datetime.timedelta(days=i) for i in range((current_date - datetime.date(current_date.year, 1, 1)).days + 1)]

# Plot the stock price changes YTD for META and TESLA

plt.plot(dates, meta_prices, label='META')

plt.plot(dates, tesla_prices, label='TESLA')

# Add labels and title to the chart

plt.xlabel('Date')

plt.ylabel('Stock Price')

plt.title('Stock Price Changes YTD')

# Add a legend

plt.legend()

# Save the chart as "stock_price_ytd.png" in the current working directory

plt.savefig('stock_price_ytd.png')

# Display the chart

plt.show()

```

Make sure you have the necessary permissions to write files in the current working directory. The line `plt.savefig('stock_price_ytd.png')` will save the chart as "stock_price_ytd.png" in the same directory where the Python script is executed.

Next request.

AI User:

<CAMEL_TASK_DONE>

AI Assistant:

Task completed.
「プロットのpngファイルを出力してくれるPython」を記述することには成功しました。
総評として、まずBabyAGIではプロットまでできなかったです。AutoGenとCamelであれば、今回のユースケースであれば、同じような精度で行えるのではないかと感じました。
ただ、AutoGenではパラメータ調節など、自由にカスタマイズができる点が強みだと思います。一方で、Camelの方が、実装が非常に簡単だというメリットがあります。
公式ページにて他の実用的なユースケースがサンプルコード付きで紹介されていますので、気になる方は覗いてみてください。
AutoGenの注意点
カスタマイズ性が高く非常に便利なAutoGenですが、以下の点にはよく注意して利用しましょう。
| カテゴリー | 注意点 | 対策 |
|---|---|---|
| プライバシー・セキュリティ | APIを介して外部にデータを送信するため、機密情報が漏洩するリスクがある。 | 機密データを送信しない、またはオンプレミスのLLM(Azure OpenAI, ローカルLlama3など)を活用する。 |
| コスト管理 | OpenAI API を使用する場合、リクエストごとに課金され、エージェントが増えるとコストが膨大になる。 | APIの使用制限を設定、ローカルLLM の導入、キャッシュを活用 して無駄なリクエストを減らす。 |
| エージェントの誤作動・ループ | AIエージェント同士のやりとりが制御不能になり、無限ループや無意味な対話が発生する可能性がある。 | 適切な停止条件を設定、ログ監視、エージェント間の制約(最大試行回数など)を明確化。 |
| ハルシネーション | AIが事実と異なる情報を生成するリスクがあり、信頼性の高い出力を保証できない。 | 人間によるレビューを必須にする、ファクトチェックエージェントを組み込む、出力の根拠を求めるプロンプトを設計する。 |
| パフォーマンス・スケーラビリティ | 複数のエージェントが連携すると、処理が遅くなり、応答時間が長くなることがある。 | エージェントの役割を最適化、並列処理を活用、キャッシュを利用 し負荷を分散。 |
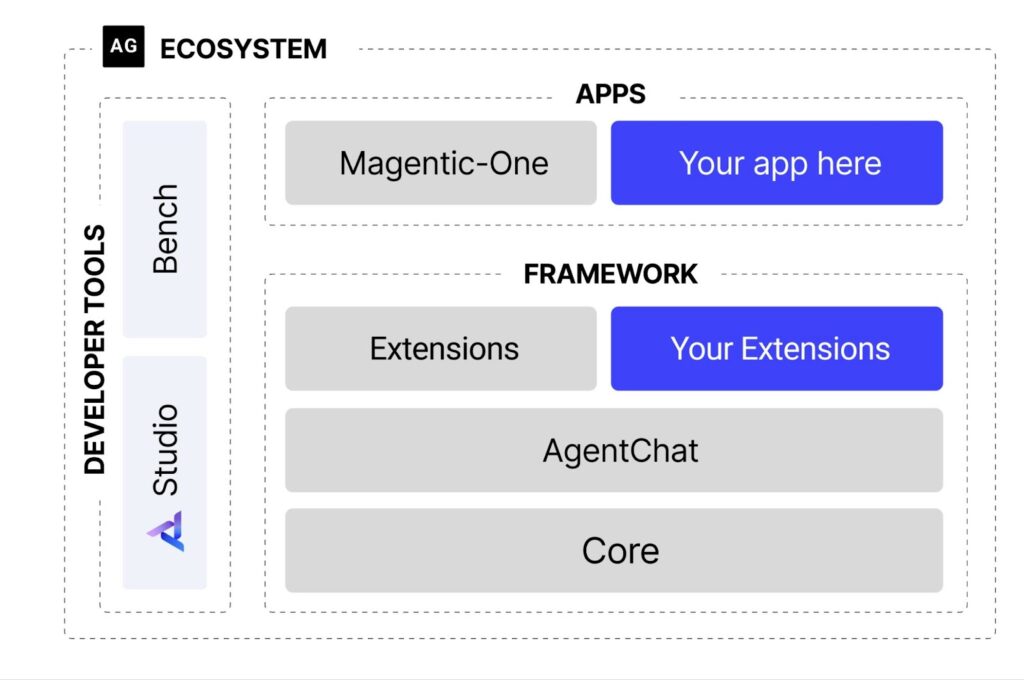
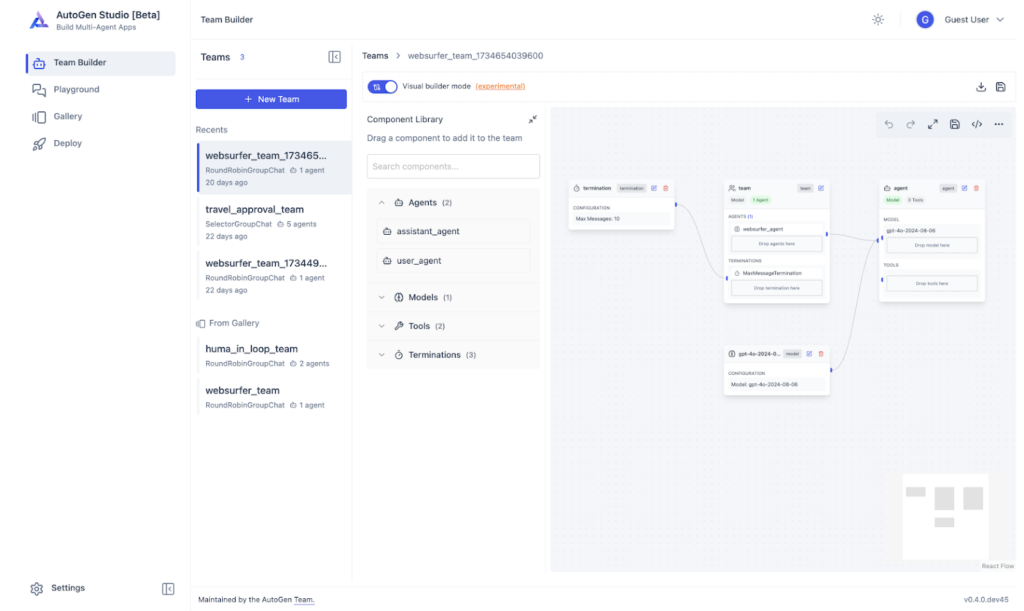
AutoGen Studioとの相違点
AutoGenは、Pythonベースのライブラリであり、プログラミングを通じて複数のLLMエージェントを連携させ、タスクを自動化するためのフレームワークですが、AutoGen Studioは、AutoGenをより直感的に扱えるノーコード/ローコードツールで、プログラミングなしで、視覚的なインターフェースを用いてエージェントの設定やワークフローを構築することができます。
主な違いは以下の通りです。
| 相違点 | AutoGen | AutoGen Studio |
|---|---|---|
| 環境 | プログラミングベース | ノーコードベース |
| カスタマイズ性 | コードベースで自由にロジック変更可能 | フローチャートベースでエージェントの連携を設計 |
| ターゲット層 | 研究・開発者向け | 非エンジニア向け |
コードを書いて高度なカスタマイズをしたい開発者・研究者の方は「AutoGen」、ノーコードで手軽にAIエージェントを活用したいビジネスユーザー・初心者の方は「AutoGen Studio」…などの使い分けもできますね。
まとめ
AutoGenは、「複数のエージェント」が相互に会話しながらタスクを解決するLLMマルチエージェントフレームワークです。AutoGenを使うことで、LLMに複雑なタスクの処理を解かせることが可能になります。
特に、命令を一言プロンプト入力するだけで、ほとんど自動的にタスクを遂行できる点は魅力的です。
また、AutoGenの設定は他のツールと比べて少し複雑ですが、調節によるカスタマイズも可能であり、柔軟性が高いと思います。
ただし、実装が少し面倒くさいというデメリットもありますので、ご自身のタスク要件に応じてAutoGen Studioの利用も検討してみましょう。

最後に
いかがだったでしょうか?
マルチエージェントの活用でLLMの精度向上を実現し、より高度なタスクを自動化しませんか?AutoGenを業務に導入することで、AIの可能性を最大限に引き出す方法をご提案します。
株式会社WEELは、自社・業務特化の効果が出るAIプロダクト開発が強みです!
開発実績として、
・新規事業室での「リサーチ」「分析」「事業計画検討」を70%自動化するAIエージェント
・社内お問い合わせの1次回答を自動化するRAG型のチャットボット
・過去事例や最新情報を加味して、10秒で記事のたたき台を作成できるAIプロダクト
・お客様からのメール対応の工数を80%削減したAIメール
・サーバーやAI PCを活用したオンプレでの生成AI活用
・生徒の感情や学習状況を踏まえ、勉強をアシストするAIアシスタント
などの開発実績がございます。
生成AIを活用したプロダクト開発の支援内容は、以下のページでも詳しくご覧いただけます。
➡︎株式会社WEELのサービスを詳しく見る。
まずは、「無料相談」にてご相談を承っておりますので、ご興味がある方はぜひご連絡ください。
➡︎生成AIを使った業務効率化、生成AIツールの開発について相談をしてみる。

「生成AIを社内で活用したい」「生成AIの事業をやっていきたい」という方に向けて、生成AI社内セミナー・勉強会をさせていただいております。
セミナー内容や料金については、ご相談ください。
また、サービス紹介資料もご用意しておりますので、併せてご確認ください。