
Ollamaの使い方完全ガイド!WindowsでローカルLLMを動かす手順と検証結果を紹介

- Ollamaはローカル環境で動作し、外部サーバーに依存せずLLM推論や高度な言語処理が可能
- オープンソースのOllamaはOpenAI互換APIや多様な言語モデルを一括管理
- 商用利用も可能なMITライセンスで、個人・企業ともに安全かつ柔軟に活用できる
「ローカル環境で手軽にLLM推論したい」「機密性の高いデータを保護しつつ高度な言語処理したい」などの悩みを一度でも持ったことがある方、その悩みを解決するツール「Ollama」についてご説明します!
Ollama はオープンソースで、モデルのダウンロード・管理から実行、OpenAI 互換のローカル APIまでをワンパッケージで提供します。加えて、近年は独自エンジンや新機能も続々強化され、使い勝手と信頼性が大きく向上しました。
しかも、外部サーバーに依存することなく、ローカル環境で高度な言語処理ができるとのこと。つまり、「Ollama」はLLM推論を高速かつユーザーフレンドリーな形で利用できちゃうんです!
そんな「Ollama」について本記事で徹底解説しますので、ぜひ最後までご覧ください!
\生成AIを活用して業務プロセスを自動化/
Ollamaとは?
「Ollama」は、オラマと読み、アメリカのAIスタートアップ Ollama, Inc. が開発したローカルLLM実行ツールです。2023年8月にリリースされ、ローカル環境でも高度なLLM推論ができる点が強みのオープンソースのAIツールです。
さまざまな便利機能がリリースされており、2024年12月6日にリリースされたStructured Outputs機能では、JSONスキーマで定義したフォーマットにLLMの出力を制御することが可能になりました。
公式ブログ上では、以下のようなStructured Outputsのユースケースが紹介されているので参考にしてみてください!
- ドキュメントからのデータ解析
- 画像からのデータ抽出
- すべての言語モデルの応答の構造化
- JSONモードよりも高い信頼性と一貫性


Ollamaの特徴

Ollamaの主な特徴は、ローカル環境で大規模言語モデル(LLM)を実行できる点にあります。クラウドサービスに依存せず、手元のPCでAIモデルを管理できるため、機密性の高いデータを扱う場面でも活用しやすい仕組みです。
また、API連携やカスタムモデルの作成など、開発用途にも対応した柔軟な設計が特徴です。
主な特徴は以下の通りです。
- ローカル環境で動作しし、オフラインでも利用可能Thinking(思考表示)のON/OFF切り替えに対応
- OpenAI互換API及びAnthropic互換APIに対応
- Cloud Models(Preview)によるクラウド実行に対応
- Modelfileによるカスタムモデル作成が可能
ローカル実行に対応
Ollamaはローカル環境で動作するツールであり、AIモデルを自分のパソコン上で実行できます。そのため、データを外部のサーバーへ送信する必要がなく、機密性の高い情報を扱う場合でも安心して利用できます。
また、インターネットに接続していないオフライン環境でも利用できるため、開発や検証用途でも活用しやすい点が特徴です。さらに、クラウドサービスのようなAPI利用料金が発生しないため、継続的な運用コストを抑えやすいメリットもあります。
Thinking(思考表示)の制御
対応モデルでは推論過程(think出力)を表示・非表示で切り替えられます。これは、AIが回答を生成するまでにどのような思考プロセスをたどったのかを確認できる機能です。
開発や検証の場面では思考過程を表示することで、AIがどのような理由で回答を出したのかを理解しやすくなります。一方で、本番環境では思考過程を非表示にすることで、ユーザーには最終的な回答のみを表示する運用も可能です。
用途に応じて表示設定を使い分けられる点が特徴です。
API互換性の高さ
OpenAI互換APIに対応しており、既存のOpenAI向けコードをほぼそのまま利用できます。つまり、これまでOpenAIのAPIを使って開発していたアプリケーションでも、接続先をOllamaのローカルサーバーに変更するだけで動作させられる場合があります。
さらに、Anthropic Messages API(/v1/messages)形式にも対応しているため、Claude向けツールとの連携も可能です。このように複数のAPI形式に対応していることで、既存ツールや開発環境と組み合わせて利用しやすい点が特徴です。
OpenAI互換APIの接続方法
OllamaはOpenAI互換APIに対応しており、既存のOpenAI向けコードをほぼそのまま利用できます。デフォルトではhttp://localhost:11434でサーバーが起動します。
エンドポイント
- Chat Completions: /v1/chat/completions
- Completions: /v1/completions
- Embeddings: /v1/embeddings
curlでの接続例
curl http://localhost:11434/v1/chat/completions \

  -H "Content-Type: application/json" \

  -d '{

    "model": "llama3",

    "messages": [

      {"role": "user", "content": "こんにちは"}

    ]

  }'
Python(OpenAI SDK互換)での接続例
from openai import OpenAI

client = OpenAI(

    base_url="http://localhost:11434/v1",

    api_key="ollama"  # 任意の文字列でOK

)

response = client.chat.completions.create(

    model="llama3",

    messages=[

        {"role": "user", "content": "こんにちは"}

    ]

)

print(response.choices[0].message.content)
ポイント
- base_urlを localhost:11434/v1に変更するだけで利用可能
- APIキーは任意文字列でOK(ローカル実行のため認証不要)
- 既存のOpenAI向けアプリをローカルLLMへ簡単に切り替え可能
Anthropic互換API(/v1/messages)でClaude Codeなどを接続できる
OllamaはAnthropic Messages API(/v1/messages)互換を提供しており、Claude CodeのようにAnthropic APIを前提とするツールも、ローカルのOllamaへ接続できます。接続はANTHROPIC_BASE_URLをhttp://localhost:11434に向けるだけで成立し、認証トークンは「必須だが検証されない」扱いです。
export ANTHROPIC_AUTH_TOKEN=ollama

export ANTHROPIC_API_KEY=""

export ANTHROPIC_BASE_URL=http://localhost:11434

curl http://localhost:11434/v1/messages \

  -H "Content-Type: application/json" \

  -d '{

    "model": "qwen3-coder",

    "max_tokens": 128,

    "messages": [{"role":"user","content":"Hello!"}]

}'Cloud Modelsへの対応
Cloud Models(Preview)により、ローカル環境からクラウド上の大規模モデルを利用できます。通常、ローカルで大きなAIモデルを動かすには高性能なGPUや十分なメモリが必要ですが、Cloud Modelsを利用することで、クラウド上の高性能なモデルを呼び出して処理を行うことが可能です。
そのため、手元のパソコンの性能に制限がある場合でも、大規模モデルを活用できます。ハードウェア性能に応じてローカルとクラウドを使い分けられる柔軟性も特徴です。
Modelfileによる拡張
Modelfileを使えば、ベースとなるモデルや生成パラメータ、プロンプト構造を定義し、用途に合わせてカスタムモデルを作成できます。例えば、回答のスタイルや出力形式、システムプロンプトなどを事前に設定しておくことで、特定の用途に最適化したAIの動作を実現できます。
これにより、毎回同じ設定を入力する必要がなくなり、開発や運用を効率化できる点が特徴です。用途に応じてモデルの振る舞いを柔軟に調整できるため、アプリ開発や検証環境でも活用しやすい機能といえます。
ollama launchによる開発環境構築の自動化
近年のアップデートで追加された注目機能の一つが「ollama launch」です。ollama launchは、ローカルLLMとコーディングツールの連携を簡単にセットアップできるCLI機能で、開発用途での初期構築を自動化する役割を持ちます。
従来は、エディタ設定・API接続・環境変数設定などを個別に行う必要がありましたが、ollama launchを使うことで、推奨構成のテンプレートをもとに環境構築を効率化可能です。
特に以下の用途で活用が期待されています。
- ローカルLLMを使ったAIコーディング環境の構築
- Claude CodeやOpenAI SDK互換ツールとの接続補助
- チーム開発環境の標準化
今後、Ollamaは「ローカル推論ツール」から「開発基盤ツール」へと進化していく可能性があり、その中核機能の一つがollama launchと位置付けられています。
ローカルLLMの仕組みや、日本語対応モデルの選び方について詳しく知りたい方は、以下の記事をご覧ください。

Ollamaでサポートしている言語モデル
Ollamaは様々な言語モデルに対応しており、ユースケースに応じて最適なモデルを選択可能です。
以下は代表的なモデル例です。
| モデル | 主なユースケース |
|---|---|
| Llama 3系 | 文章生成、要約、校正 |
| Gemma系 | 医療・法務テキスト解析 |
| Qwen系 | 文章生成、要約、対話 |
| Mistral系 | 意味解析、感情分析 |
| Code Llama | コード生成、デバッグ |
| LLaVA | 画像キャプション生成、画像認識 |
| DeepSeek系 | 数学、コード、推論タスク |
Ollamaのライセンスと商用利用について
Ollama本体はMITライセンスのもとで公開されています。ライセンス詳細は以下の通りです。
| 利用用途 | 可否 |
|---|---|
| 商用利用 | ⭕ |
| 改変 | ⭕ |
| 配布 | ⭕ |
| 特許利用 | ⭕ |
| 私的利用 | ⭕ |
類似ツールとの比較
Ollamaと類似ツールの比較をしてみましょう。比較表は以下の通りです。
| ツール | 強み | 弱み | ターゲット |
|---|---|---|---|
| Ollama | ・導入が容易 ・モデル管理とOpenAI互換APIが一体 ・CLI自動ダウンロード ・公式デスクトップアプリ | ・大規模同時接続、高スループットは専門サーバに劣る場合あり | まずローカルで動かしたい開発者/小規模サービス検証 |
| LM Studio | ・GUI完結 ・WindowsのiGPU/AMDで Vulkan経由のオフロードが得意 ・モデル探索が簡単 | ・API周りの自由度はツール依存 ・一部環境で互換性に差があり | コマンドレスで使いたい、ノートPCやミニPCのiGPU活用 |
| vLLM | ・連続バッチング等で高スループット ・OpenAI互換サーバを提供 | ・構築、運用の学習コストは高め | 本番環境での高並列推論、GPU集約(サーバ用途) |
これらのツールを比較すると、Ollamaは「ローカルLLMを簡単に導入できる開発向けツール」という立ち位置にあります。GUI中心のLM Studioは手軽さを重視するユーザーに向いている一方、vLLMは高並列推論など本番環境向けの高性能サーバ用途に強みがあります。
OllamaはCLIを中心としたシンプルな設計で、モデルのダウンロードやAPIサーバーの起動を簡単に行える点が特徴です。そのため、ローカル環境でLLMを試したい開発者や、小規模なアプリケーションの検証用途で選ばれることが多いツールといえるでしょう。
Ollamaの使い方
ここからは実際にOllamaを使っていきます。早速Ollamaのインストールを進めていきましょう!
Ollamaのシステム要件
- OS:macOS 12+, Linux, Windows 10+
- RAM:最低8GB(16GB以上推奨)
- ストレージ:モデルによって異なるが、最低10GB以上の空き容量
なお、実際の動作可否はGPUのVRAM容量とモデルサイズによって大きく左右されます。目安となるVRAM容量は、モデルサイズごとに次のような構成です。
- 4Bクラス:VRAM 4GB前後
- 8Bクラス:VRAM 8GB前後
- 30Bクラス以上:VRAM 20GB以上
また、量子化モデル(例:Q4・Q5など)を選択すれば、必要VRAMを抑えて動作させることも可能です。自分のPCで動くか不安な場合は、軽量モデルや量子化版から試すとよいでしょう。
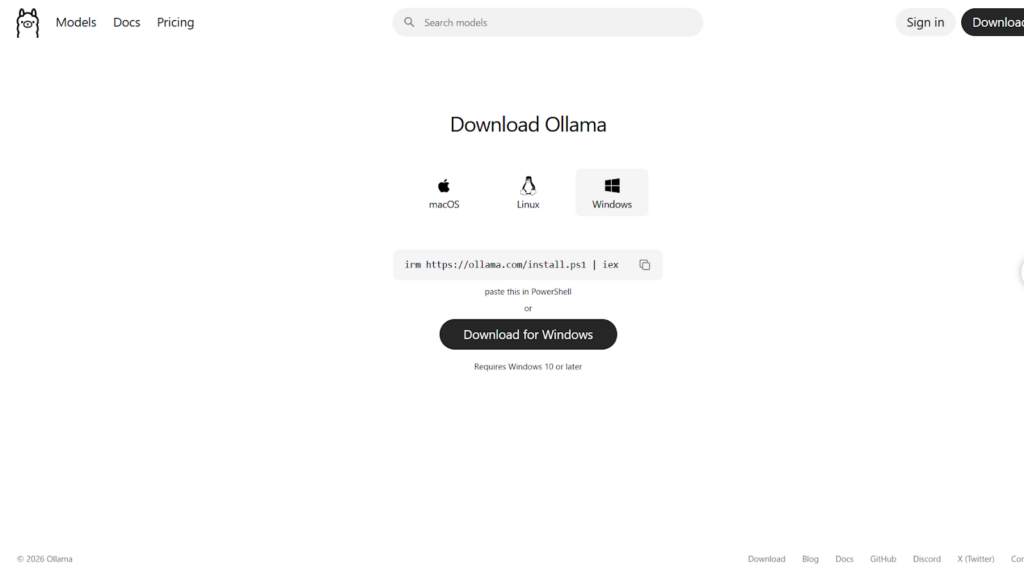
インストーラーを実行
インストーラーをダウンロードし、指示に従ってollamaコマンドがターミナル上で動かせるようになれば導入は完了です!
ollama --version
# ollama version is 0.××.×
筆者は導入に5分もかからなかったので、お手軽に環境構築できる点も非常にありがたいですね…!
Ollamaを使う際の注意点
ここまでOllamaの良い点をあげてきましたが、利用する際にはいくつか注意点もあります。代表的なポイントを以下にまとめました。
長期間使用していない場合、初回応答に時間がかかる
Ollamaを長時間利用していない状態から再度モデルを呼び出す場合、モデルのロード処理が行われるため、レスポンスが返るまでに数十秒程度かかる場合があります。
GPUメモリが占有された状態になる場合がある
Ollamaでは、モデルをロードしたあと一定時間メモリ上に保持する仕組みがあります。そのため、利用していない場合でもGPUメモリを占有する可能性があります。保持時間は keep_alive パラメータや環境変数 OLLAMA_KEEP_ALIVE によって調整できます。
外部公開には注意が必要
Ollamaはローカル利用を前提とした設計ですが、誤って外部に公開してしまうケースも報告されています。たとえば、ホストを0.0.0.0に設定したままインターネットへ公開すると、第三者から不正利用されるリスクがあります。
基本的にはlocalhostでの利用を前提とし、外部公開する場合はアクセス制御やファイアウォール設定、CORS制限などを適切に行いましょう。別PCから利用したい場合は、ポートを直接公開するのではなく、SSHトンネル(ポートフォワーディング)を利用する方法が安全です。
SSHトンネルを使えば、通信を暗号化しながらローカルポートを安全に転送できるため、不用意なインターネット公開を避けられます。
サーバーの公開範囲は、環境変数OLLAMA_HOSTで制御できます。例として、127.0.0.1:11434に固定すれば外部からアクセスできません。また、OLLAMA_ORIGINSを指定することで、許可するCORSオリジンを制御できます。


OllamaでLlama-3-ELYZA-JP-8Bを動かしてみた
ここからは実際に、日本語に特化した大規模言語モデル「Llama-3-ELYZA-JP-8B」を動かしてみます!
Llama-3-ELYZA-JP-8Bは、ELYZA社が提供する「ELYZA LLM for JP」シリーズの最新モデルとして、Meta社の「Llama 3」をベースとした80億パラメータの大規模言語モデルです。ELYZA社の発表では、GPT-3.5クラスと同等レベルの性能を目指した設計とされていますが、詳細なベンチマーク結果は公開されていません。
モデルダウンロード
Hugging Faceから「Llama-3-ELYZA-JP-8B-q4_k_m.gguf」をダウンロードします。
Modelfileは、Ollamaでカスタムモデルを作るための設定ファイルです。Modelfileで指定できる項目(FROM / PARAMETER / TEMPLATE / SYSTEM / REQUIRES など)は、バージョンにより追加・変更される場合があります。
ファイル作成
Modelfileを作成し、Llama3モデルと同じ内容になるように、以下の設定を記述します。
FROM ./Llama-3-ELYZA-JP-8B-q4_k_m.gguf

TEMPLATE """{{ if .System }}<|start_header_id|>system<|end_header_id|>

{{ .System }}<|eot_id|>{{ end }}{{ if .Prompt }}<|start_header_id|>user<|end_header_id|>

{{ .Prompt }}<|eot_id|>{{ end }}<|start_header_id|>assistant<|end_header_id|>

{{ .Response }}<|eot_id|>"""

PARAMETER stop "<|start_header_id|>"

PARAMETER stop "<|end_header_id|>"

PARAMETER stop "<|eot_id|>"

PARAMETER stop "<|reserved_special_token"モデル作成
以下コマンドを実行して、2で作成したファイルからモデルを作成します。
ollama create elyza:jp8b -f Modelfile10秒ほどで作成が完了しました!
モデル実行
以下のコマンドでモデルを実行します。
ollama run elyza:jp8bプロンプト入力
モデルを実行すると以下のような入力欄が表示されるので、色々試していきましょう!

> ollama run elyza:jp8b<br>>>> Send a message (/? for help)一問一答(Q.歴代で最も興行収入が高い映画は?)
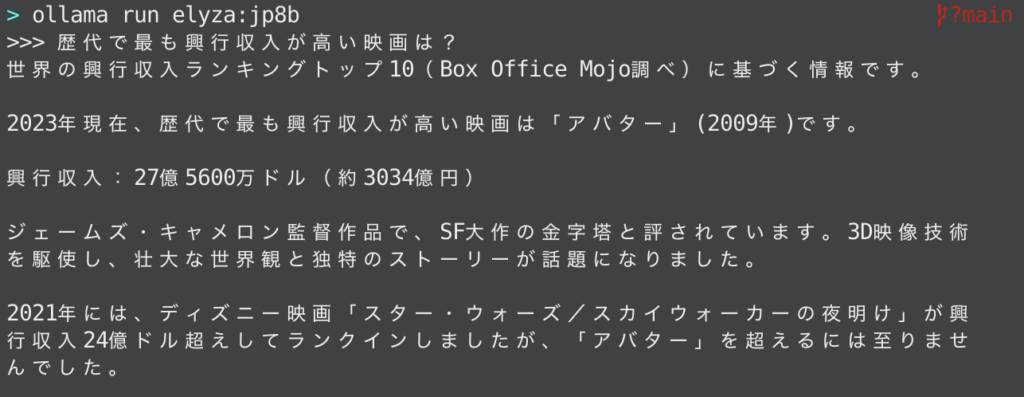
回答
世界の興行収入ランキングトップ10(Box Office Mojo調べ)に基づく情報です。

2023年現在、歴代で最も興行収入が高い映画は「アバター」(2009年)です。

興行収入:27億5600万ドル(約3034億円)

ジェームズ・キャメロン監督作品で、SF大作の金字塔と評されています。3D映像技術を駆使し、壮大な世界観と独特のストーリーが話題になりました。

2021年には、ディズニー映画「スター・ウォーズ/スカイウォーカーの夜明け」が興行収入24億ドル超えしてランクインしましたが、「アバター」を超えるには至りませんでした。
一問一答(Q.最初に宇宙へ行った人は誰で、いつ?)
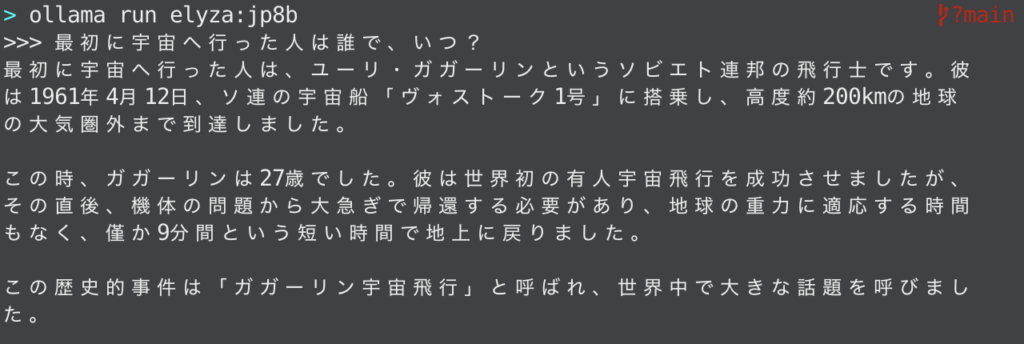
回答
最初に宇宙へ行った人は、ユーリ・ガガリーンというソビエト連邦の飛行士です。彼は1961年4月12日、ソ連の宇宙船「ヴォストーク1号」に搭乗し、高度約200kmの地球の大気圏まで到達しました。

この時、ガガーリンは27歳でした。彼は世界初の有人宇宙飛行を成功させましたが、その直後、機体の問題で大急ぎで帰還する必要があり、地球の重力に適応する時間もなく、僅か9分間という短い時間で地上に戻りました。

この歴史的事件は「ガガーリン宇宙飛行」と呼ばれ、世界中で大きな話題を呼びました。
アルゴリズム実装(Q.クイックソートをPythonで書いてください)
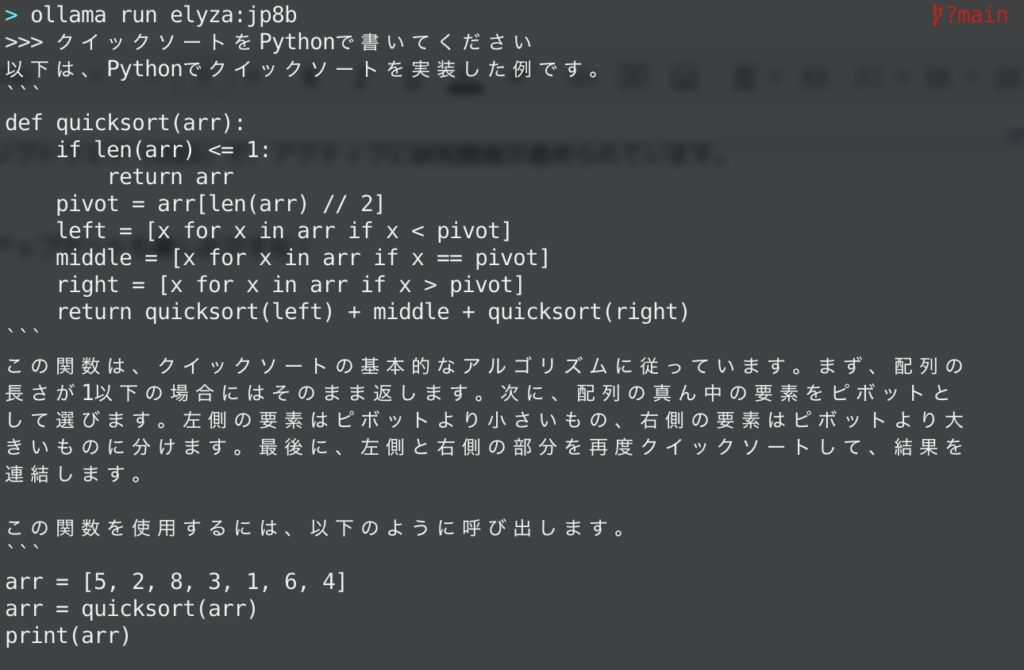
回答
以下は、Pythonでクイックソートを実装した例です。

def quicksort(arr):

if len(arr) <= 1:

return arr

pivot = arr[len(arr) // 2]

left = [x for x in arr if x < pivot]

middle = [x for x in arr if x == pivot]

right = [x for x in arr if x > pivot]

return quicksort(left) + middle + quicksort(right)

この関数は、クイックソートの基本的なアルゴリズムに従っています。まず、配列の長さが1以下の場合にはそのまま返します。次に、配列の真ん中の要素をピボットとして選びます。左側の要素はピボットより小さいもの、右側の要素はピボットより大きいものに分けます。最後に、左側と右側の部分を再度クイックソートして、結果を連結します。

この関数を使用するには、以下のように呼び出します。

arr = [5, 2, 8, 3, 1, 6, 4]

arr = quicksort(arr)

print(arr)生成AIを活用した翻訳は下記で解説

AI要約もできるNotebookLMは下記で解説

プロンプトエンジニアリングは下記で解説

OllamaでDeepSeek-R1:1.5Bを動かしてみた
続いて、DeepSeek-R1の蒸留モデルであり、最軽量モデル「DeepSeek-R1-Distill-Qwen-1.5B」を試してみます!
モデルダウンロード
Ollama DeepSeek-R1サポートページからモデルをダウンロードします。まずは、ドロップダウンから「1.5b」を選択します。
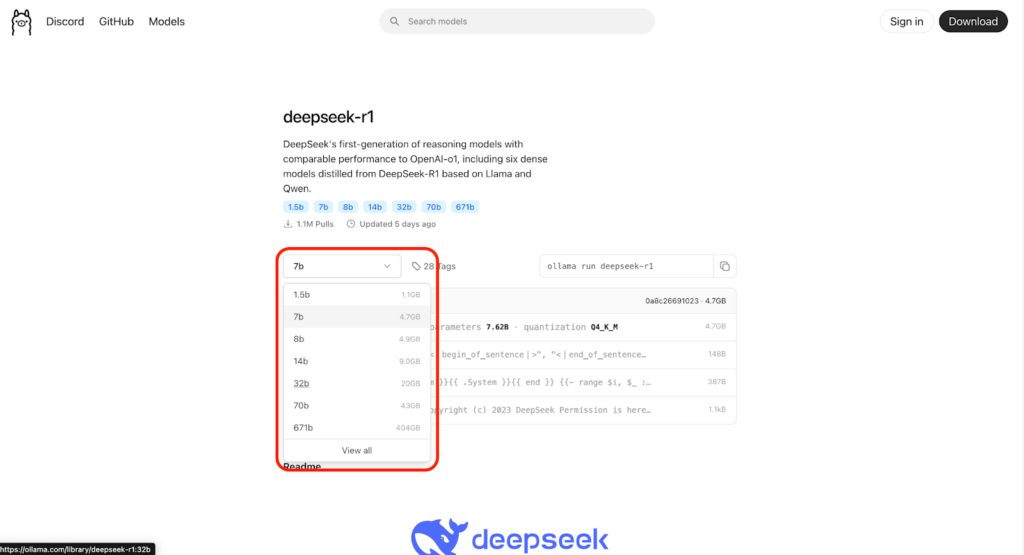
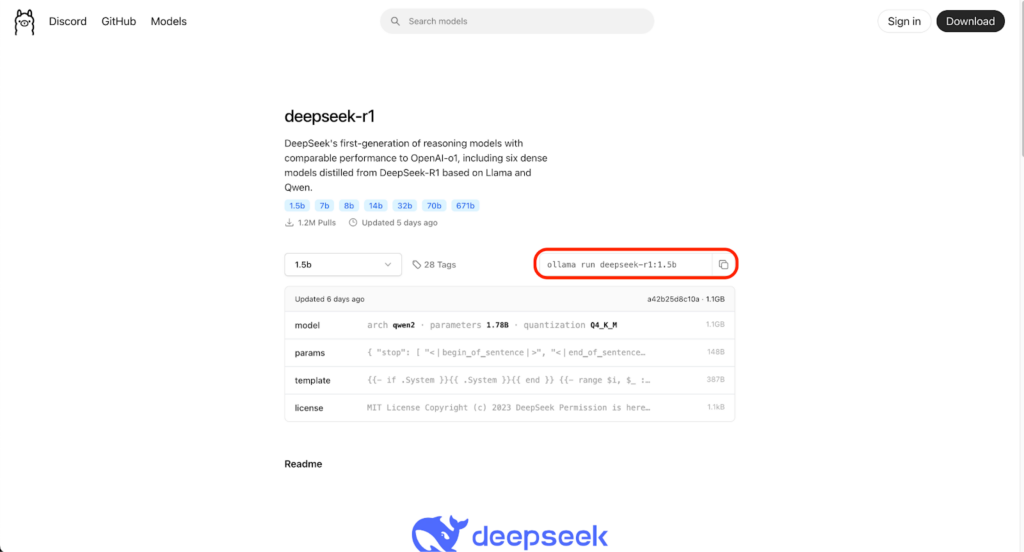
すると以下の画像の通り、モデルダウンロード用コマンドが表示されるので、クリップボードにコピーしましょう。
モデル実行
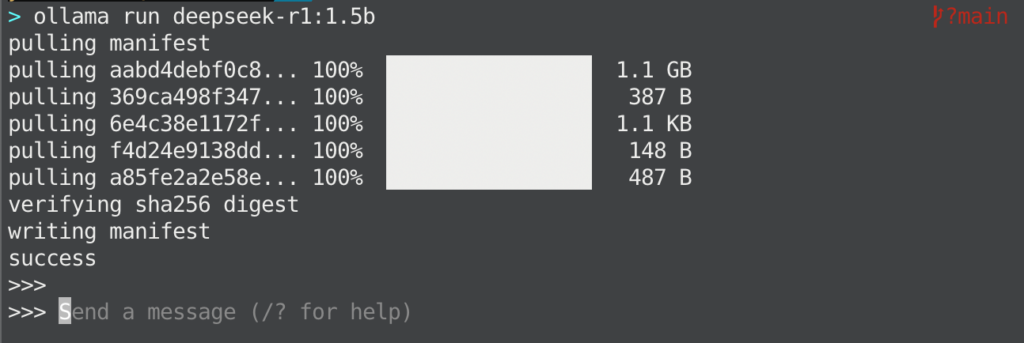
先ほどコピーしたコマンドをターミナルで実行します。
ollama run deepseek-r1:1.5bダウンロードが完了すると以下のようにプロンプトが打ち込める状態になるので、これでモデルの実行は完了です。
プロンプト入力
せっかくなので、「Llama-3-ELYZA-JP-8B」と同じプロンプトで出力結果の比較検証をしてみましょう。
Q.クイックソートをPythonで書いてください回答
<think>
Alright, the user is asking for a Quicksort implementation in Python. I
need to provide a clear and concise solution.

I'll structure the code step by step, explaining each part so it's easy to
follow.

First, I'll write the function definition with parameters arr and return.

Next, the base case: if the array has one or zero elements, just return it
as is.

Then, I'll choose a pivot. For simplicity, I'm choosing the last element.

After that, partition the array into elements less than pivot, equal to,
and greater than.

I'll handle the equal part recursively by sorting the smaller subarray.

Finally, concatenate the sorted parts: less + equal (sorted) + greater.

I should test it with a simple example to ensure it works.

Make sure to add comments explaining each step so the user understands how
the code functions.
</think>

はい! Quicksort は要素をative分のwayで、最eadyが選択し、要素が左右に分
classified します。 下の例を参考に writing your own implementation of
QuickSort in Python。

以下は Quicksort 的算法を Python で示した code です:

```python
def quicksort(arr):
    if len(arr) <= 1:
        return arr

    pivot = arr[-1]
    less = [x for x in arr[:-1] if x < pivot]
    greater = [x for x in arr[:-1] if x > pivot]
    equal = [x for x in arr[:-1] if x == pivot]

    equal_sorted = quicksort(equal)
    return quicksort(less) + equal_sorted + quicksort(greater)

# 試行
print(quicksort([3, 6, 8, 10, 1, 2, 1]))
```

### 実際の codedecription:
- **Pivot**: 最eadyの要素を用いています。この例では `arr[-1]` 即然是 `1`。
- **Partition**: 順数が `pivot` 下に分 classified します。
  - 最初から `pivot` 下の要素を `\ : arr[:-1]`
  - 左の要素は `x < pivot`
  - 右の要素は `x > pivot`

### 実際の operation:
- `less` : 探索が `pivot` 下に `$less = [x for x in arr[:-1] if x <
pivot]`
- `greater`: 探索が `pivot` 下に `$greater = [x for x in arr[:-1]
if x > pivot]`

### 等同の要素:
- `[x for x in arr[:-1] if x == pivot]`

### 記号解释:
- 等同の要素を recursively sort し、sorted 形式で再 \% 多数に分 classified
します。
- 最eady `quicksort(less)` と `quicksort(greater)`を回 \ `{return
quicksort(less) + equal_sorted + quicksort(greater)`

### 実際の result:
```
[1, 2, 3, 1, 6, 8, 10]
```

Quicksort は平均 `{O(n log n)}` 时间で実現します。最eadyの要素の候補が `\
: arr[:-1]` 形式で `[x for x in arr[:-1] if x < pivot]`を用いています。中国語混じりの不自然な日本語で返ってきてしまいました。
解消法
日本語で出力するよう指示(※)してもいいですが、毎回やるのも面倒なので、システムを修正しちゃいましょう!
ひとまず、「/bye」でOllamaから抜けます。
その後、適当に空のディレクトリへ移動し、以下のコマンドを叩きます。
ollama show --modelfile deepseek-r1:1.5b > Modelfile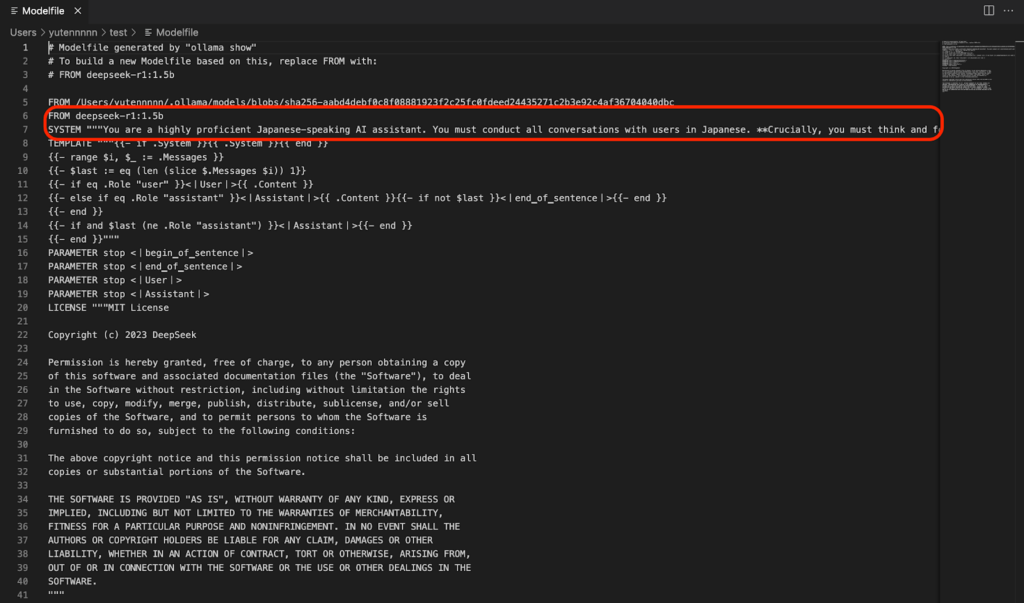
ls -la以下の画像のような出力が出るので、赤枠のModelfileをテキストエディタで開いて修正していきます。

修正する箇所は2つです。
- 6行目に「FROM deepseek-r1:1.5b」を追記
- 7行目に「SYSTEM “”You are a highly proficient Japanese-speaking AI assistant. You must conduct all conversations with users in Japanese. **Crucially, you must think and formulate your responses in Japanese.**”」を追記
修正後のModelfile完成イメージは以下の通りです。
修正したModelfileをもとにモデルを作成するため、以下のコマンドを叩きます。
ollama create deepseek-r1-1.5b-jp -f ./Modelfile生成後、モデルが問題なく作られているか、Ollamaのリストを確認してください。

これで日本語対応できているはずなので、再度モデルを実行してプロンプト入力していきます。
ollama run deepseek-r1:1.5b-jp:latestPrompt:<strong>クイックソートをPythonで書いてください</strong>修正後の回答
<think>
Alright, so I need to write a Python program that can perform a quick
sort. Hmm, quick sort is one of the most efficient sorting algorithms out
there, right? It works by selecting a pivot element and rearranging the
elements such that all elements less than the pivot come before it, and
those greater come after.

First, I should plan how to structure this program. The input will be an
array, so I'll start by reading that from standard input. That's easy
enough with the input() function in Python. But wait, what if the user
doesn't enter anything? Oh right, I should handle that case too, maybe
with a try-except block.

Once the input is read, the core of quick sort is partitioning the array.
So I need to select a pivot and split the array into elements less than or
equal to the pivot and those greater. I'll choose a random element as the
pivot because it makes the algorithm more efficient on average by reducing
the number of comparisons.

Next, I have to recursively apply the same process to the subarrays on
either side of the pivot until the entire array is sorted.

I should think about data types. The array elements can be integers or
maybe strings? Looking back at the user's message, it seems like they want
a numerical sort, so probably integers are intended.

Now, how to handle edge cases? For example, if all elements are the same,
the algorithm should still work fine without issues. Also, for even and
odd numbers of elements, quick sort handles them well as long as the
recursion isn't too deep. But Python's default recursion depth limit might
be a problem for large arrays; I'll need to consider that or switch to an
iterative approach if necessary.

Testing is important. I should write test cases where I can manually check
what the sorted array should look like and ensure my code produces it
correctly.

I also want to make sure that the function returns a new list each time,
so the original input isn't modified. That's already handled by returning
a new array at each step.

Another thing is how the pivot is chosen. For randomization, using the
random module's choice function would be better than just taking the first
element or an index from a range. Maybe something like selecting between 0
and len(arr)-1 with random.randint(0, len(arr)-1).

Wait, but if I'm modifying the list during partitioning, will that affect
subsequent calls? No, because each recursive call operates on its own
subarray, so it's safe.

I should also be cautious about using recursion in a way that might hit
Python's stack limit. If the input array is too long, say over 10^4
elements, this could cause a maximum recursion depth error or slow
performance. But perhaps for most cases, especially with small inputs, it
works fine.

Putting it all together, I'll structure my program like this:

1. Read the input using input() and handle any possible exceptions.
2. Define a recursive function to perform quick sort.
3. In the function:
  a. Select a random pivot index.
  b. Partition the array into elements less than or equal to the pivot
and those greater.
  c. Recursively apply quick sort on the subarrays.
4. Call the function with the input array and print the sorted result.

I think that's a solid plan. Now, I'll translate this into Python code,
making sure everything is in Japanese as per the user's request.
</think>

```
def 快速 SORT:
    # 誰ががとる?
    pivot = random.randrange(len(arr))
    arr[pivot], arr[0] = arr[0], arr[pivot]

    # 接 rounding 选gt;
    # 掛けgt;
    less, greater = [], []
    for num in arr:
        if num <= arr[0]:
            less.append(num)
        elif num > arr[0]:
            greater.append(num)

    return 快速 SORT(less) + [arr[0]] + 快速 SORT(greater)

# 引数を入力
arr = input().strip()
# 定 number が整 数?
try:
    if arr == '':
        print('')
        exit()
except ValueError as e:
    print(e)

# 快速 SORT Done?
print 快速 SORT(arr)
```
検証結果
- Modelfile修正前ほどではないが、不完全な日本語で出力が返ってくる。
- 現状、日本語だと精度が下がるため、英語や中国語で実行させる方が良さそう。
- 「Llama-3-ELYZA-JP-8B」と比較すると、一部デバッグは必要ですが、コード自体の生成クオリティや生成スピードは問題なし。
Ollamaの活用事例
Ollamaは、ローカル環境でLLMを実行できる特徴を活かし、さまざまなAI開発ツールやアプリケーションと組み合わせて利用されています。特に、OpenAI互換APIに対応している点から、既存のAIツールと接続しやすいことも活用が広がる理由の一つです。
実際に開発者コミュニティやX(旧Twitter)では、Ollamaを使ってローカルAI環境を構築した事例や、AIアプリケーションの開発に利用している投稿も確認されています。ここでは、Ollamaの具体的な活用事例を紹介します。
Difyと連携したローカルAIチャット環境の構築
Ollamaはローカル環境でLLMを実行できることから、AI開発ツールとの連携用途でも活用されています。例えば、AIアプリ開発ツール「Dify」と組み合わせることで、ローカルLLMを利用したチャット環境を構築する事例が開発者コミュニティで共有されています。
実際にX(旧Twitter)では、DifyとOllamaを連携させてローカルLLM環境を構築した投稿が確認できました。投稿では、OllamaのサーバーIPとポートを指定することで接続できたと紹介されており、ローカルAI開発環境の構築ツールとして活用されている様子が示されています。
ローカルAIアプリケーションとしての活用
Ollamaは、ローカル環境でLLMを動かしながらAIアプリケーションを構築する用途でも活用されています。例えば、サッカーの試合データを分析するローカルAIアナリストを構築した事例がX(旧Twitter)で共有されています。
投稿では、llama3.1:8bモデルをOllamaで実行し、プレミアリーグの試合データをもとに選手や試合の分析を行うシステムが紹介されていました。ユーザーが選手について質問すると、試合イベントデータを参照しながら分析を生成する仕組みで、ローカルLLMを利用したデータ分析ツールとして活用されていることが確認できます。
よくある質問
Ollamaの特徴と今後の可能性
今回はOllamaで「Llama-3-ELYZA-JP-8B」と「DeepSeek-R1:1.5B」を動かしてみました!実装自体は簡単だったので、ローカルLLMを活用したいという方はまずここから試してみるのも良いのでは?と感じました。
そんなOllamaの特徴は以下の内容でした!
メリット
- 外部サーバーに依存せず、ローカル環境で高度な言語処理が可能
- データのセキュリティを確保しながらLLMを活用可能
- 商用利用可能なライセンス体系
- 豊富な言語モデルに対応し、用途に応じて選択可能
外部サーバーに依存することなく、ローカル環境で高度な言語処理ができるので、活用法次第で自分専用のLLMを作れちゃう気がしました!今後のアップデートも楽しみです!

最後に
いかがだったでしょうか?
ローカル環境でのLLM推論やデータ保護が必要な場合、選択肢として「Ollama」を検討してみてください。
株式会社WEELは、自社・業務特化の効果が出るAIプロダクト開発が強みです!
開発実績として、
・新規事業室での「リサーチ」「分析」「事業計画検討」を70%自動化するAIエージェント
・社内お問い合わせの1次回答を自動化するRAG型のチャットボット
・過去事例や最新情報を加味して、10秒で記事のたたき台を作成できるAIプロダクト
・お客様からのメール対応の工数を80%削減したAIメール
・サーバーやAI PCを活用したオンプレでの生成AI活用
・生徒の感情や学習状況を踏まえ、勉強をアシストするAIアシスタント
などの開発実績がございます。
生成AIを活用したプロダクト開発の支援内容は、以下のページでも詳しくご覧いただけます。
➡︎株式会社WEELのサービスを詳しく見る。
まずは、「無料相談」にてご相談を承っておりますので、ご興味がある方はぜひご連絡ください。
➡︎生成AIを使った業務効率化、生成AIツールの開発について相談をしてみる。

「生成AIを社内で活用したい」「生成AIの事業をやっていきたい」という方に向けて、生成AI社内セミナー・勉強会をさせていただいております。
セミナー内容や料金については、ご相談ください。
また、サービス紹介資料もご用意しておりますので、併せてご確認ください。